Market Structure 103: How to Read the Market’s DNA
Most traders jump straight into indicators, signals, or “secret” strategies.
They download an RSI, MACD, or moving average, throw it on the chart, and hope the magic happens.
But here’s the brutal truth: indicators are just tools built on price.
If you don’t understand the market’s structure, the actual “language” of price itself then every tool you add is like trying to decorate a house with no foundation. It looks nice for a moment… until the whole thing collapses.
Market structure is that foundation.
It’s the raw footprint of buyers and sellers battling in real time. Every higher high, every break of a low, every consolidation zone is a clue to who’s in control, the bulls or the bears.
Think of it this way:
- Without structure, you’re guessing.
- With structure, you’re reading the market
It doesn’t matter if you trade forex, crypto, stocks, or futures the laws of market structure are universal.
And once you master it, you’ll stop being the trader who blindly follows an indicator and start being the trader who understands why price is moving the way it does.
1. The Basics of Price Structure
When you strip away all the noise indicators, news, fancy strategies the market moves in one of three ways: up, down, or sideways. That’s it. Everything else is just detail.
Yet most traders get lost because they don’t learn to see the sequence.
Price is not random: it moves in waves, creating highs and lows that tell you exactly who’s in control buyers or sellers.
The Uptrend: Higher Highs and Higher Lows
An uptrend is defined by a simple pattern:
- Each new high is higher than the previous one (Higher High, HH).
- Each new low is also higher than the previous one (Higher Low, HL).
This rhythm means buyers are stronger. Even when sellers push price down (creating a low), buyers step in earlier than before, refusing to let price fall as much as it did last time.
Think of it like climbing a staircase:
- Every new step is a Higher High.
- Every landing you rest on is a Higher Low.
As long as you keep going up, the trend is intact.
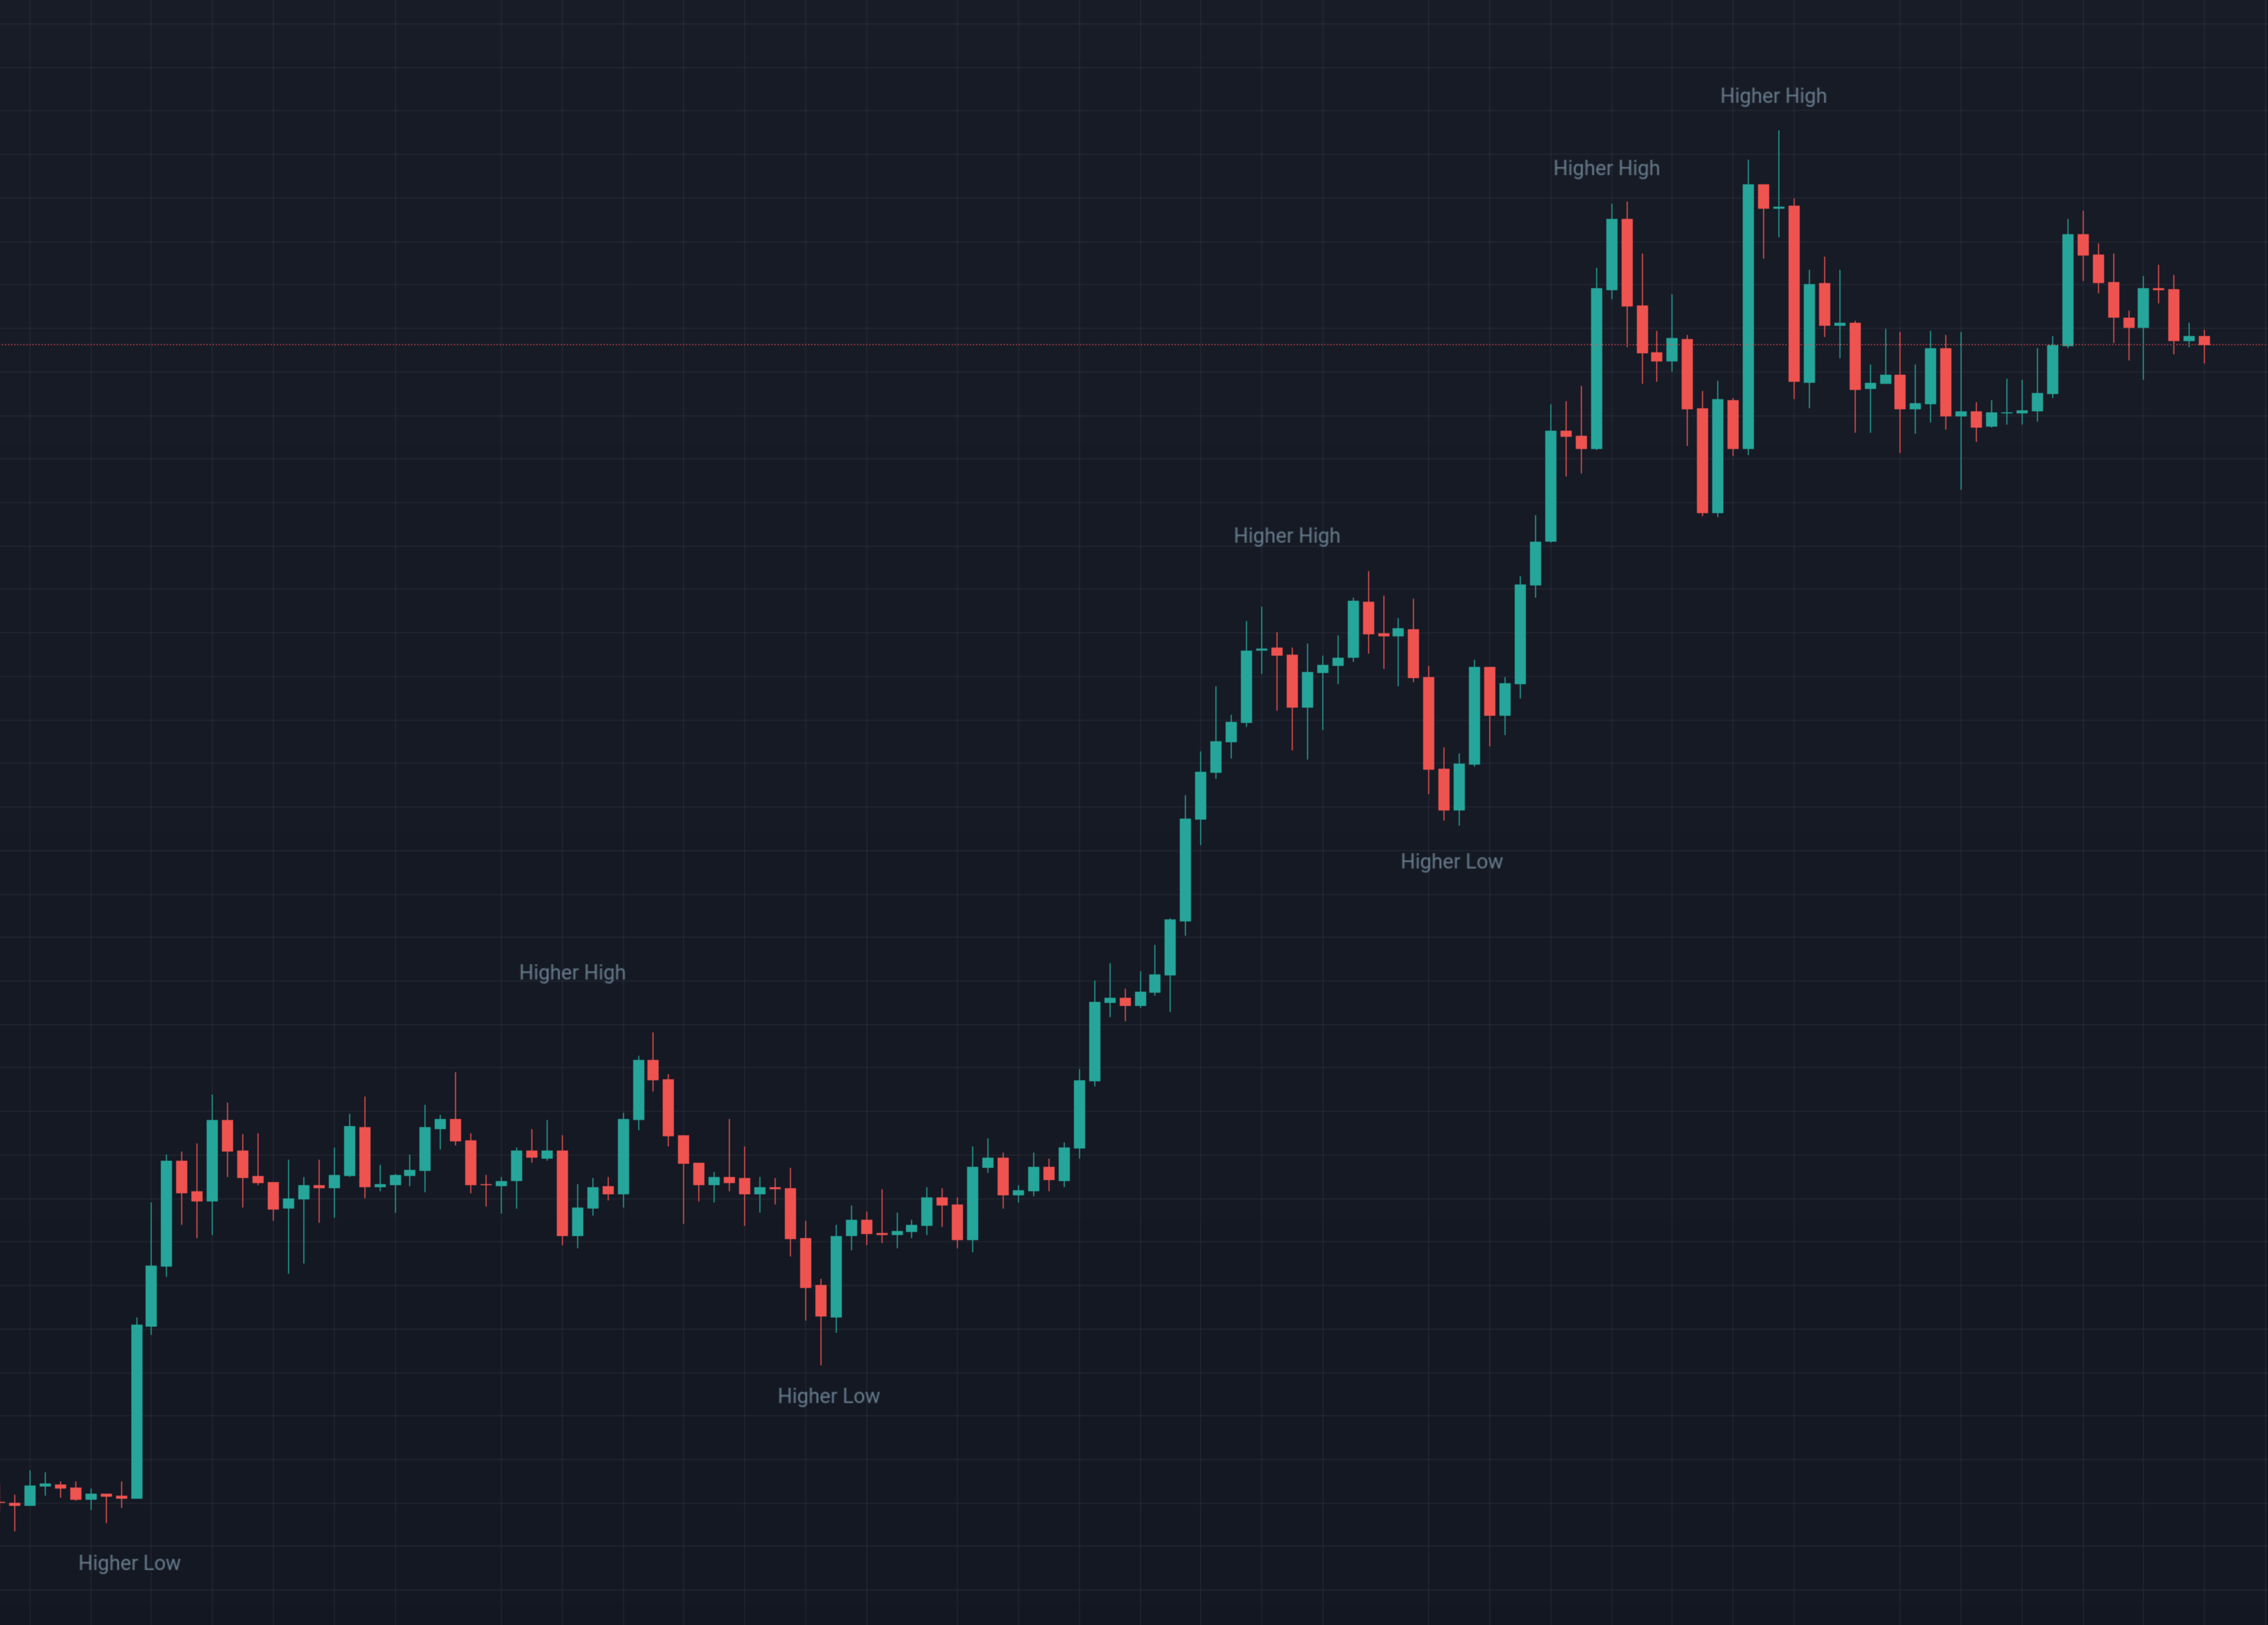
Practical takeaway:
In an uptrend, the “safe money” is with the buyers. You don’t need a crystal ball as long as HH and HL continue, price structure favors continuation.
The Downtrend: Lower Highs and Lower Lows
A downtrend is just the mirror image:
- Each new low is lower than the previous one (Lower Low, LL).
- Each rally (temporary bounce) creates a Lower High (LH) before sellers slam it down again.
Here, sellers are the dominant force. Every time buyers try to rally, they get crushed earlier than before.
Picture walking down a staircase:
- Every drop is a Lower Low.
- Every pause on the landing is a Lower High.
Unless something major shifts, you’ll keep going down.
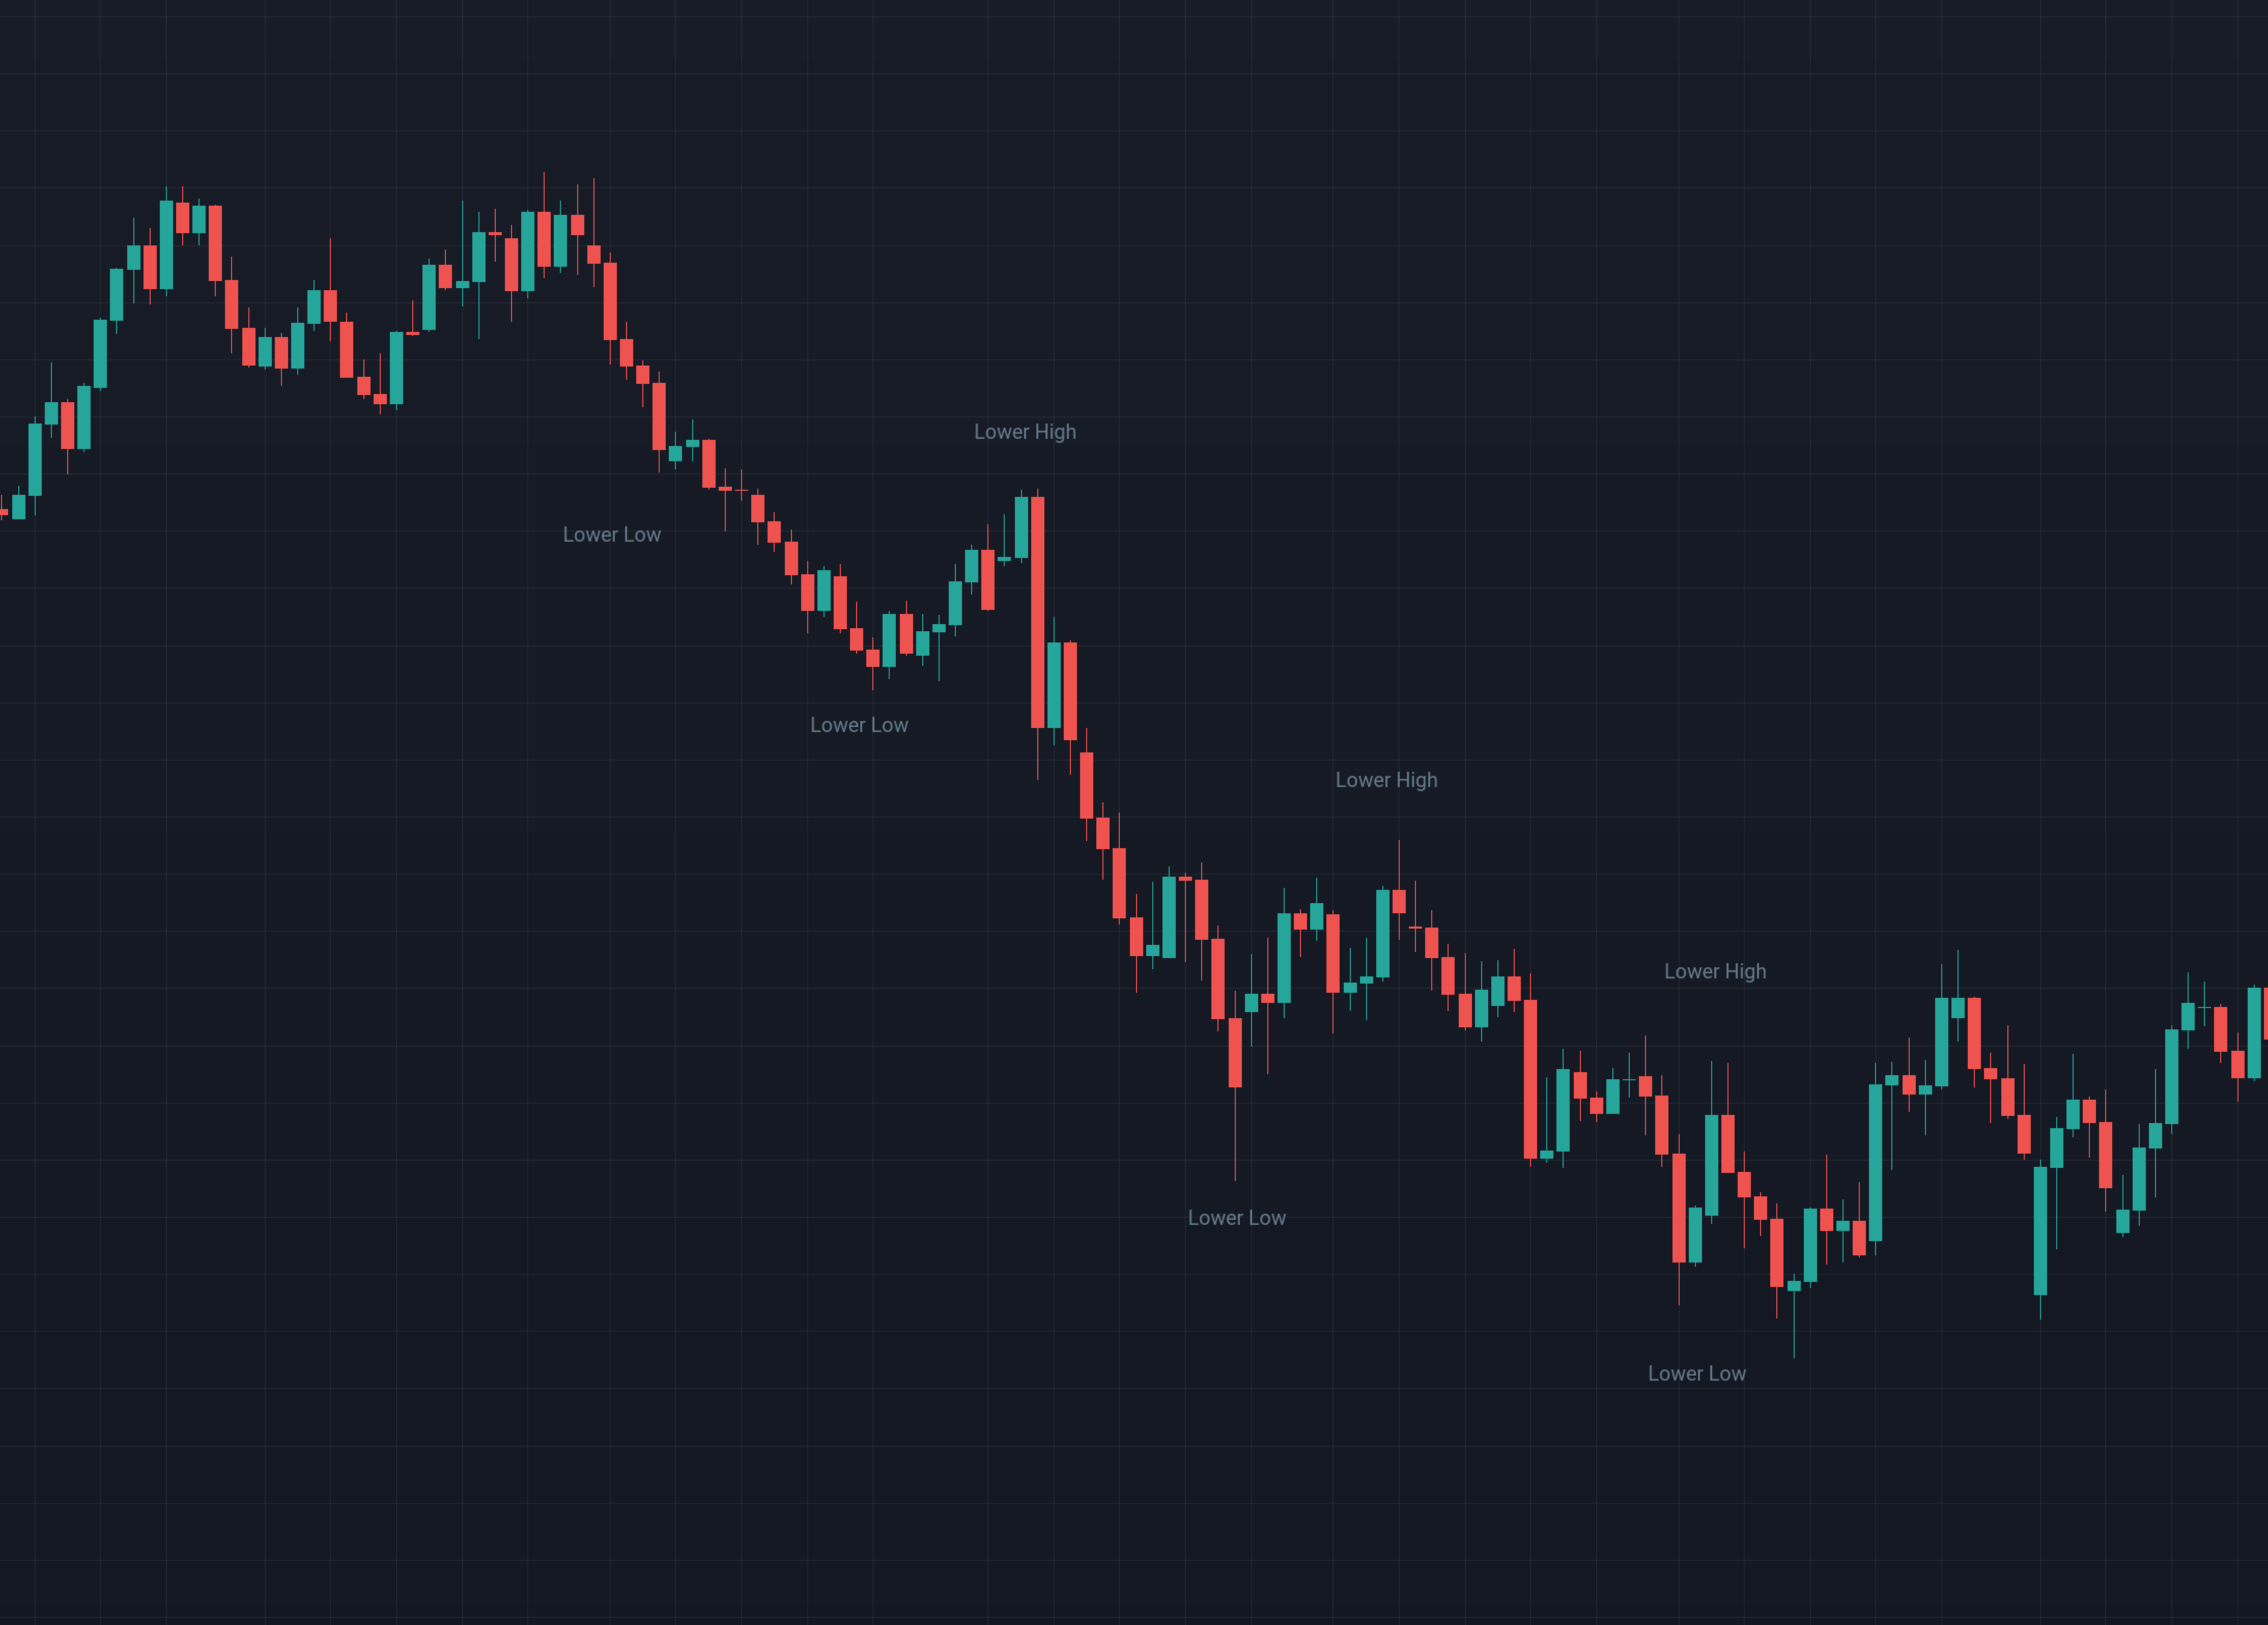
Practical takeaway:
In a downtrend, the advantage is with sellers. Trying to “catch the bottom” is usually just catching a falling knife.
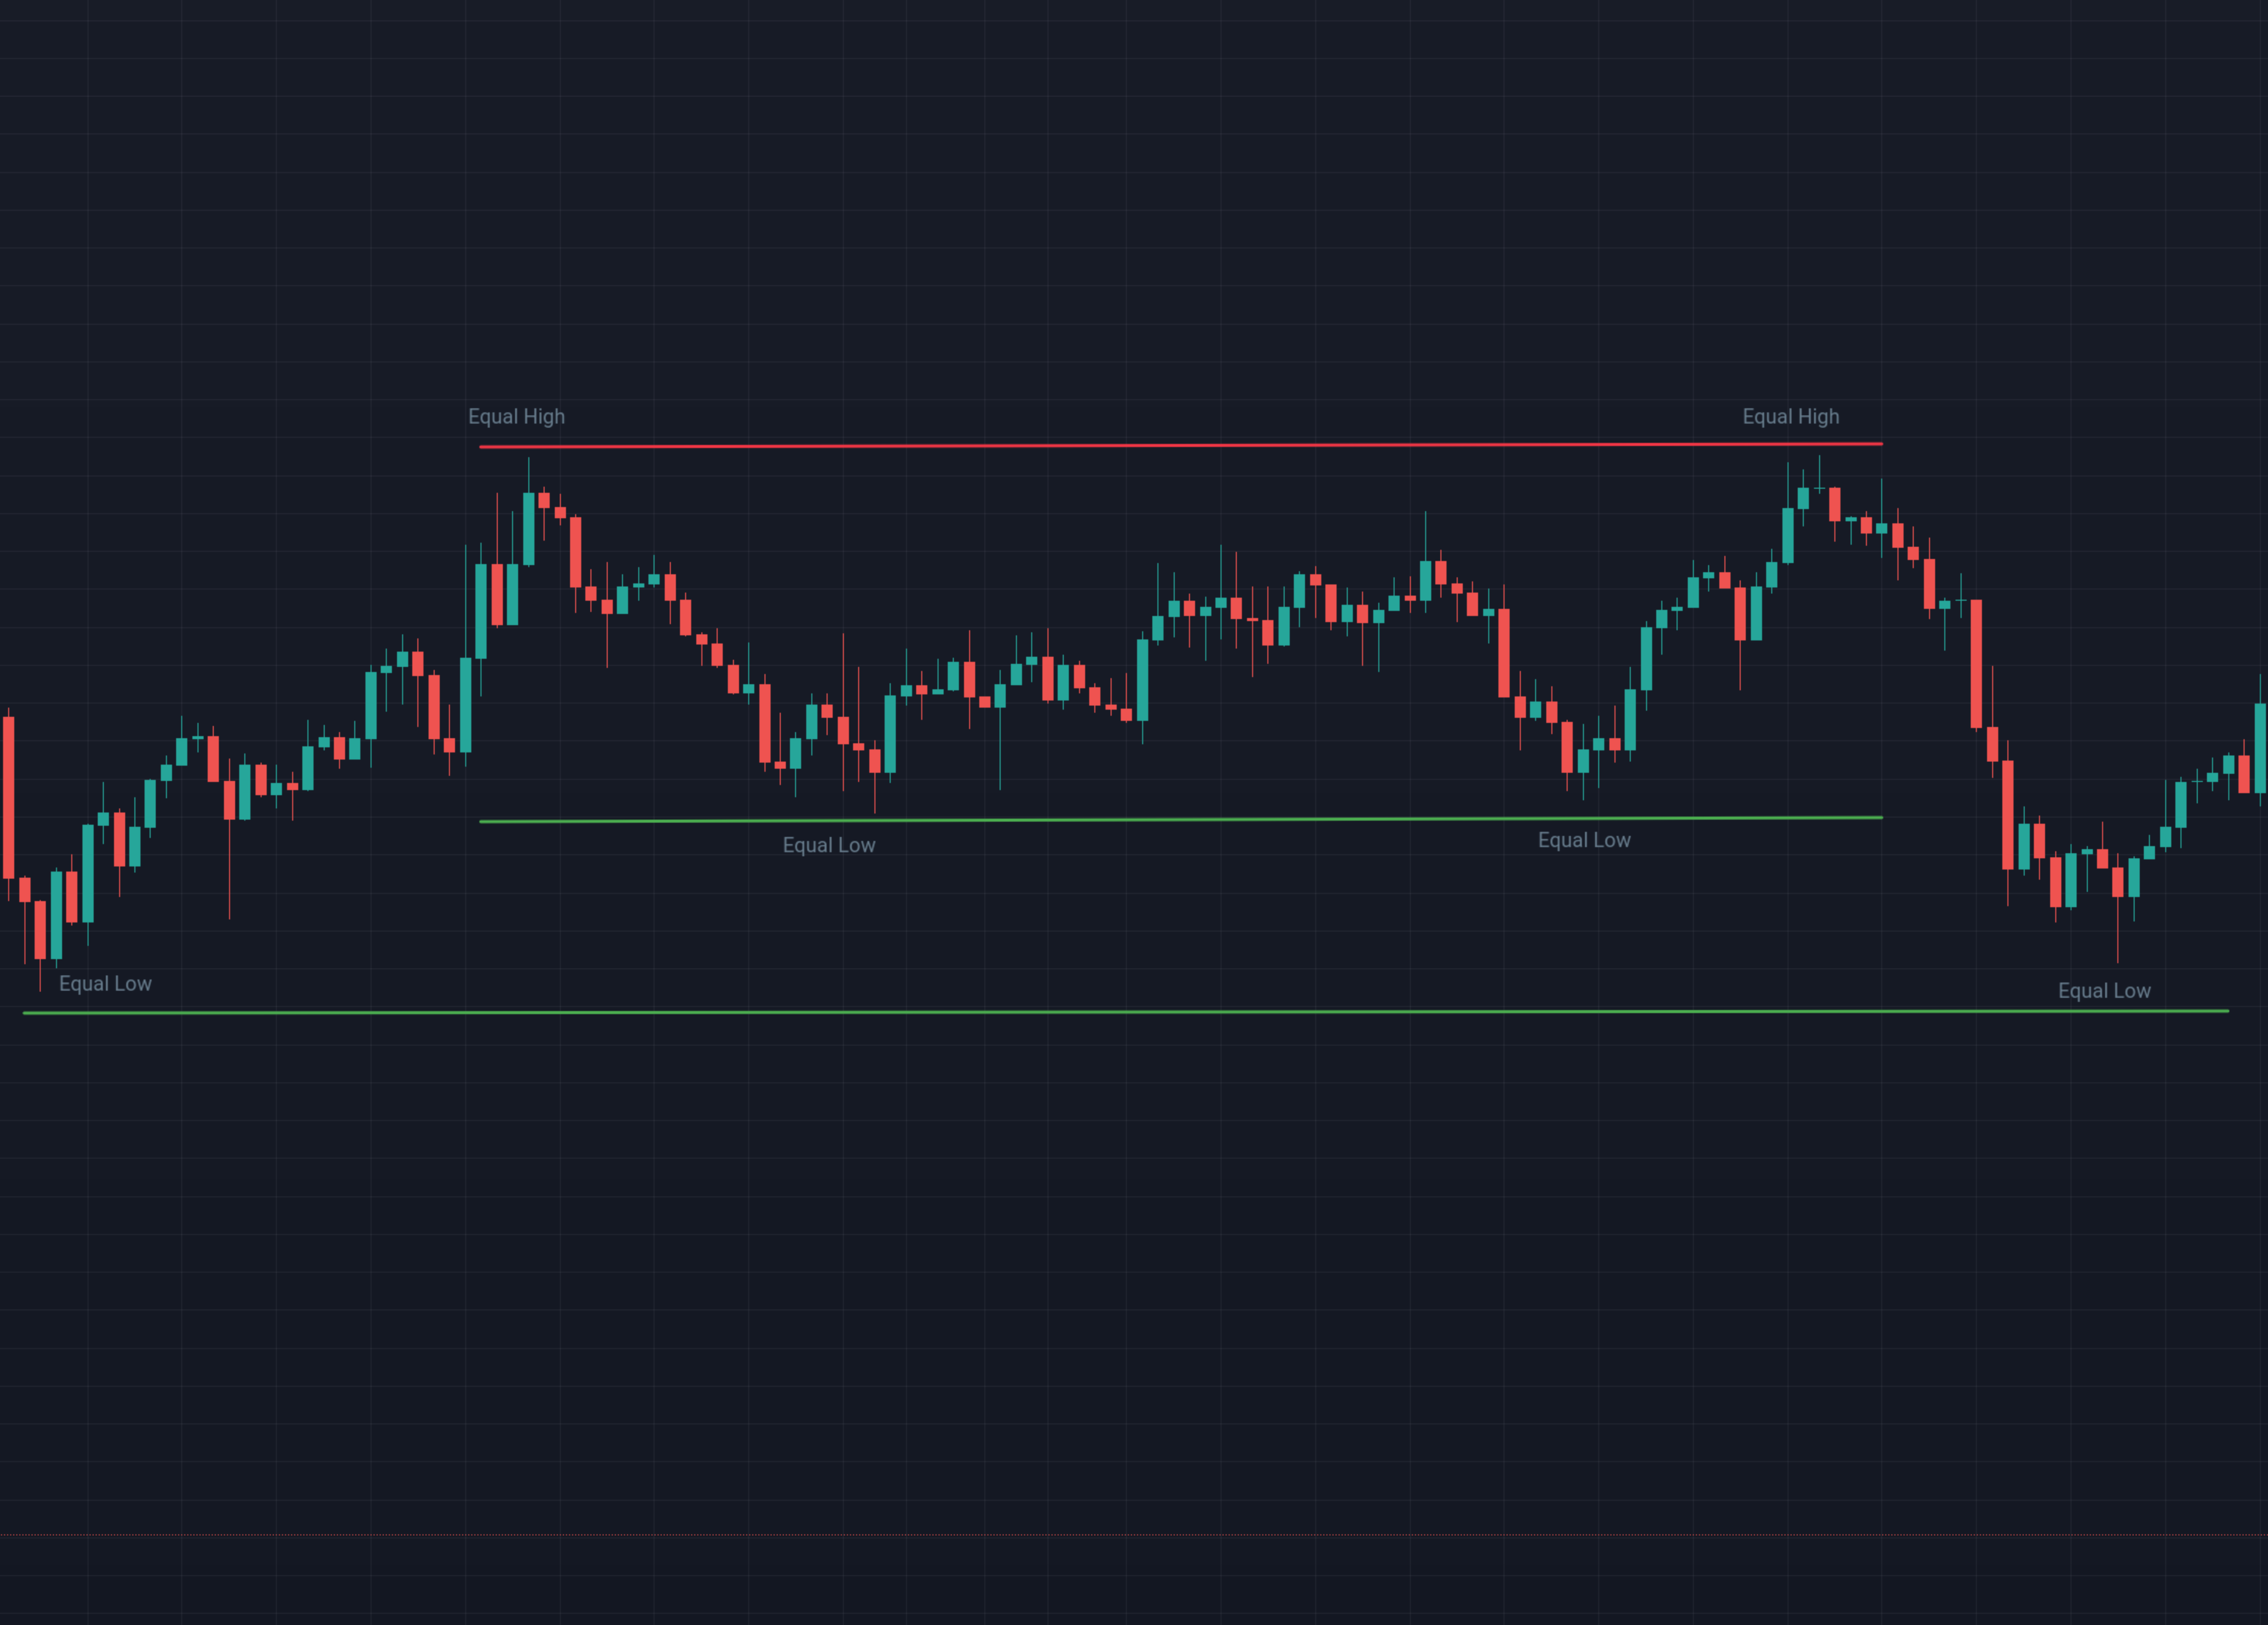
The Range: Equal Highs and Equal Lows
Not all markets trend. In fact, most of the time, markets are ranging.
That means price is bouncing between roughly equal highs and equal lows moving sideways.
This is where traders get slaughtered:
- The impatient ones try to trade breakouts too early.
- The greedy ones chase every little move and get whipsawed.
- The smart ones wait, because they know ranges are where liquidity builds up before the real move.
Think of it like the market is charging its batteries.
Sideways price action is not “nothing happening” it’s the prelude to a larger directional move.
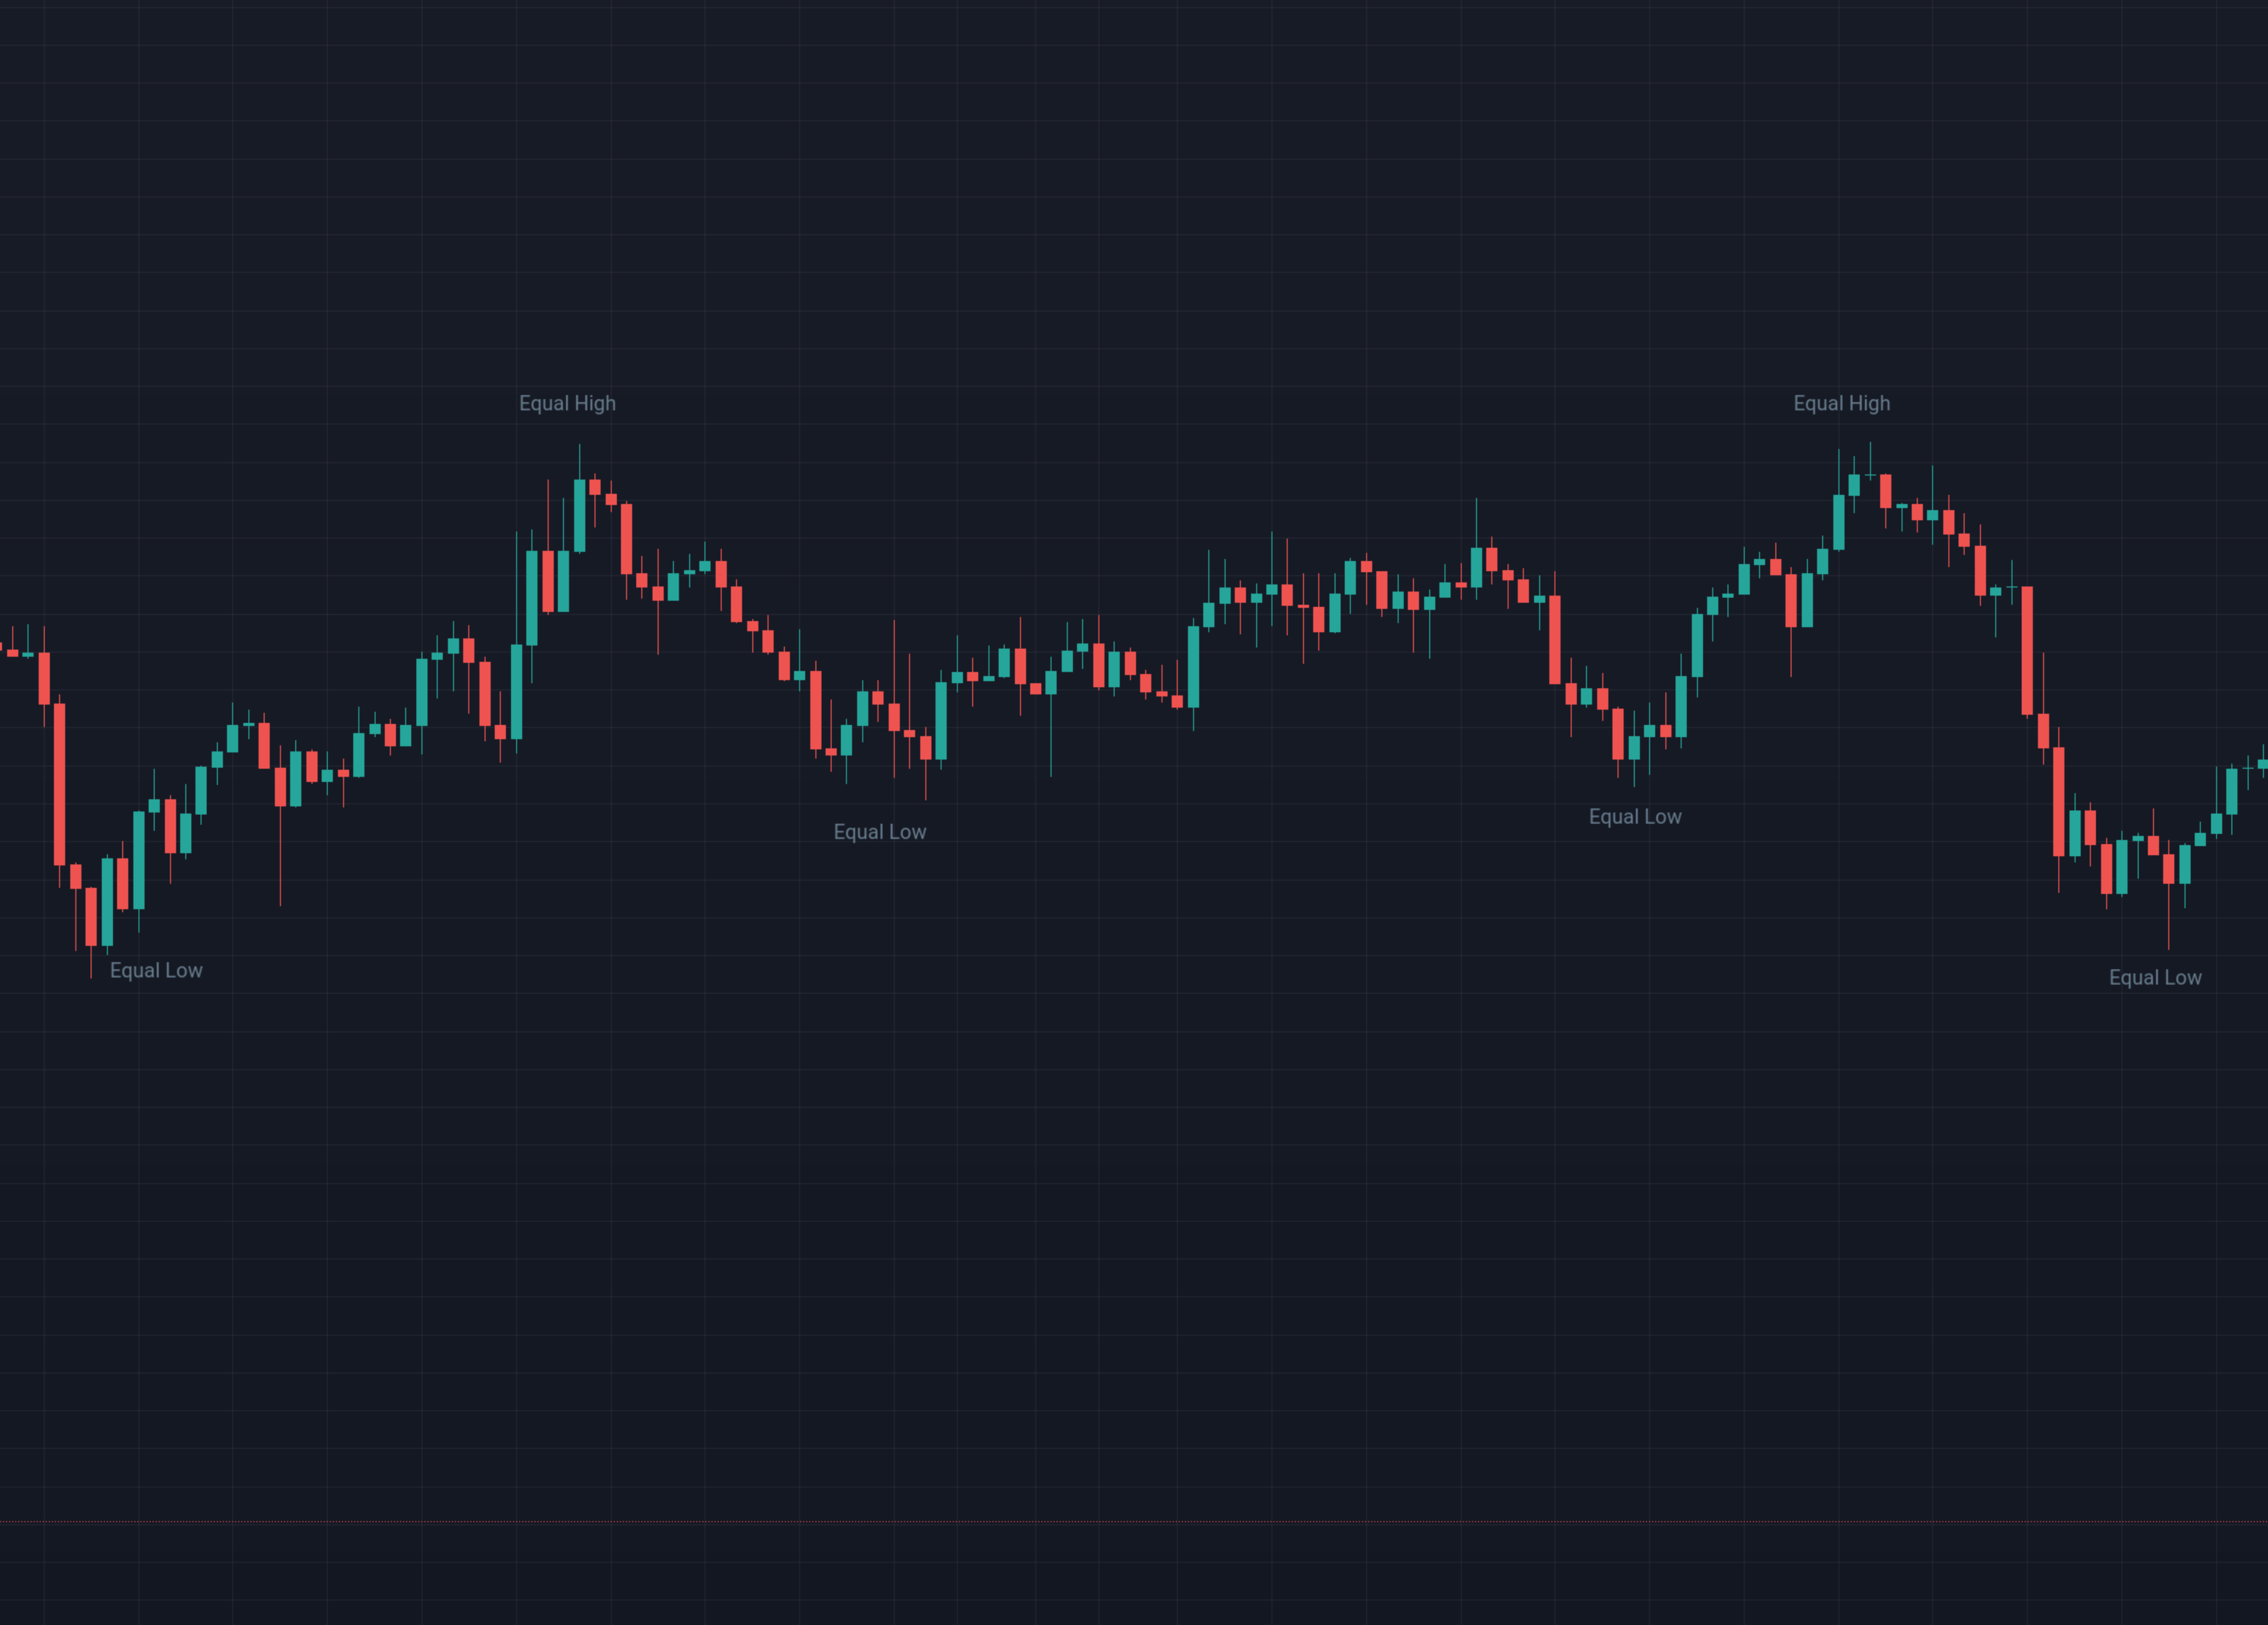
Practical takeaway:
When you see a range, mark its highs and lows. That’s where stop-losses accumulate. Later, price will often grab that liquidity before choosing the true direction.
Why This Matters
This simple framework HH/HL, LH/LL, and ranges (Equal H, Equal L) is the foundation of everything else you’ll learn:
- Support & resistance levels are built on these swings.
- Supply & demand zones are identified around them.
- Break of Structure (BOS) or Change of Character (CHOCH) is just a fancy way to say: “the rhythm of highs and lows has shifted.”
If you don’t master this, no indicator, or advanced strategy will save you.
2. Key Building Blocks
Once you understand highs and lows, you need to add context. Markets don’t just move in straight lines: they react, pause, reverse, and trap traders. These reactions form the building blocks of market structure.
Here are the pillars you must know:
Break of Structure (BOS) vs Change of Character (CHOCH)
These are terms traders love to throw around, but the idea is simple:
- Break of Structure (BOS): confirms the continuation of the current trend.
Example: in an uptrend, a new Higher High breaking the previous High = BOS. - Change of Character (CHOCH): signals a possible reversal.
Example: in an uptrend, price breaks below a Higher Low → maybe the first sign sellers are taking control.
BOS = trend is alive.
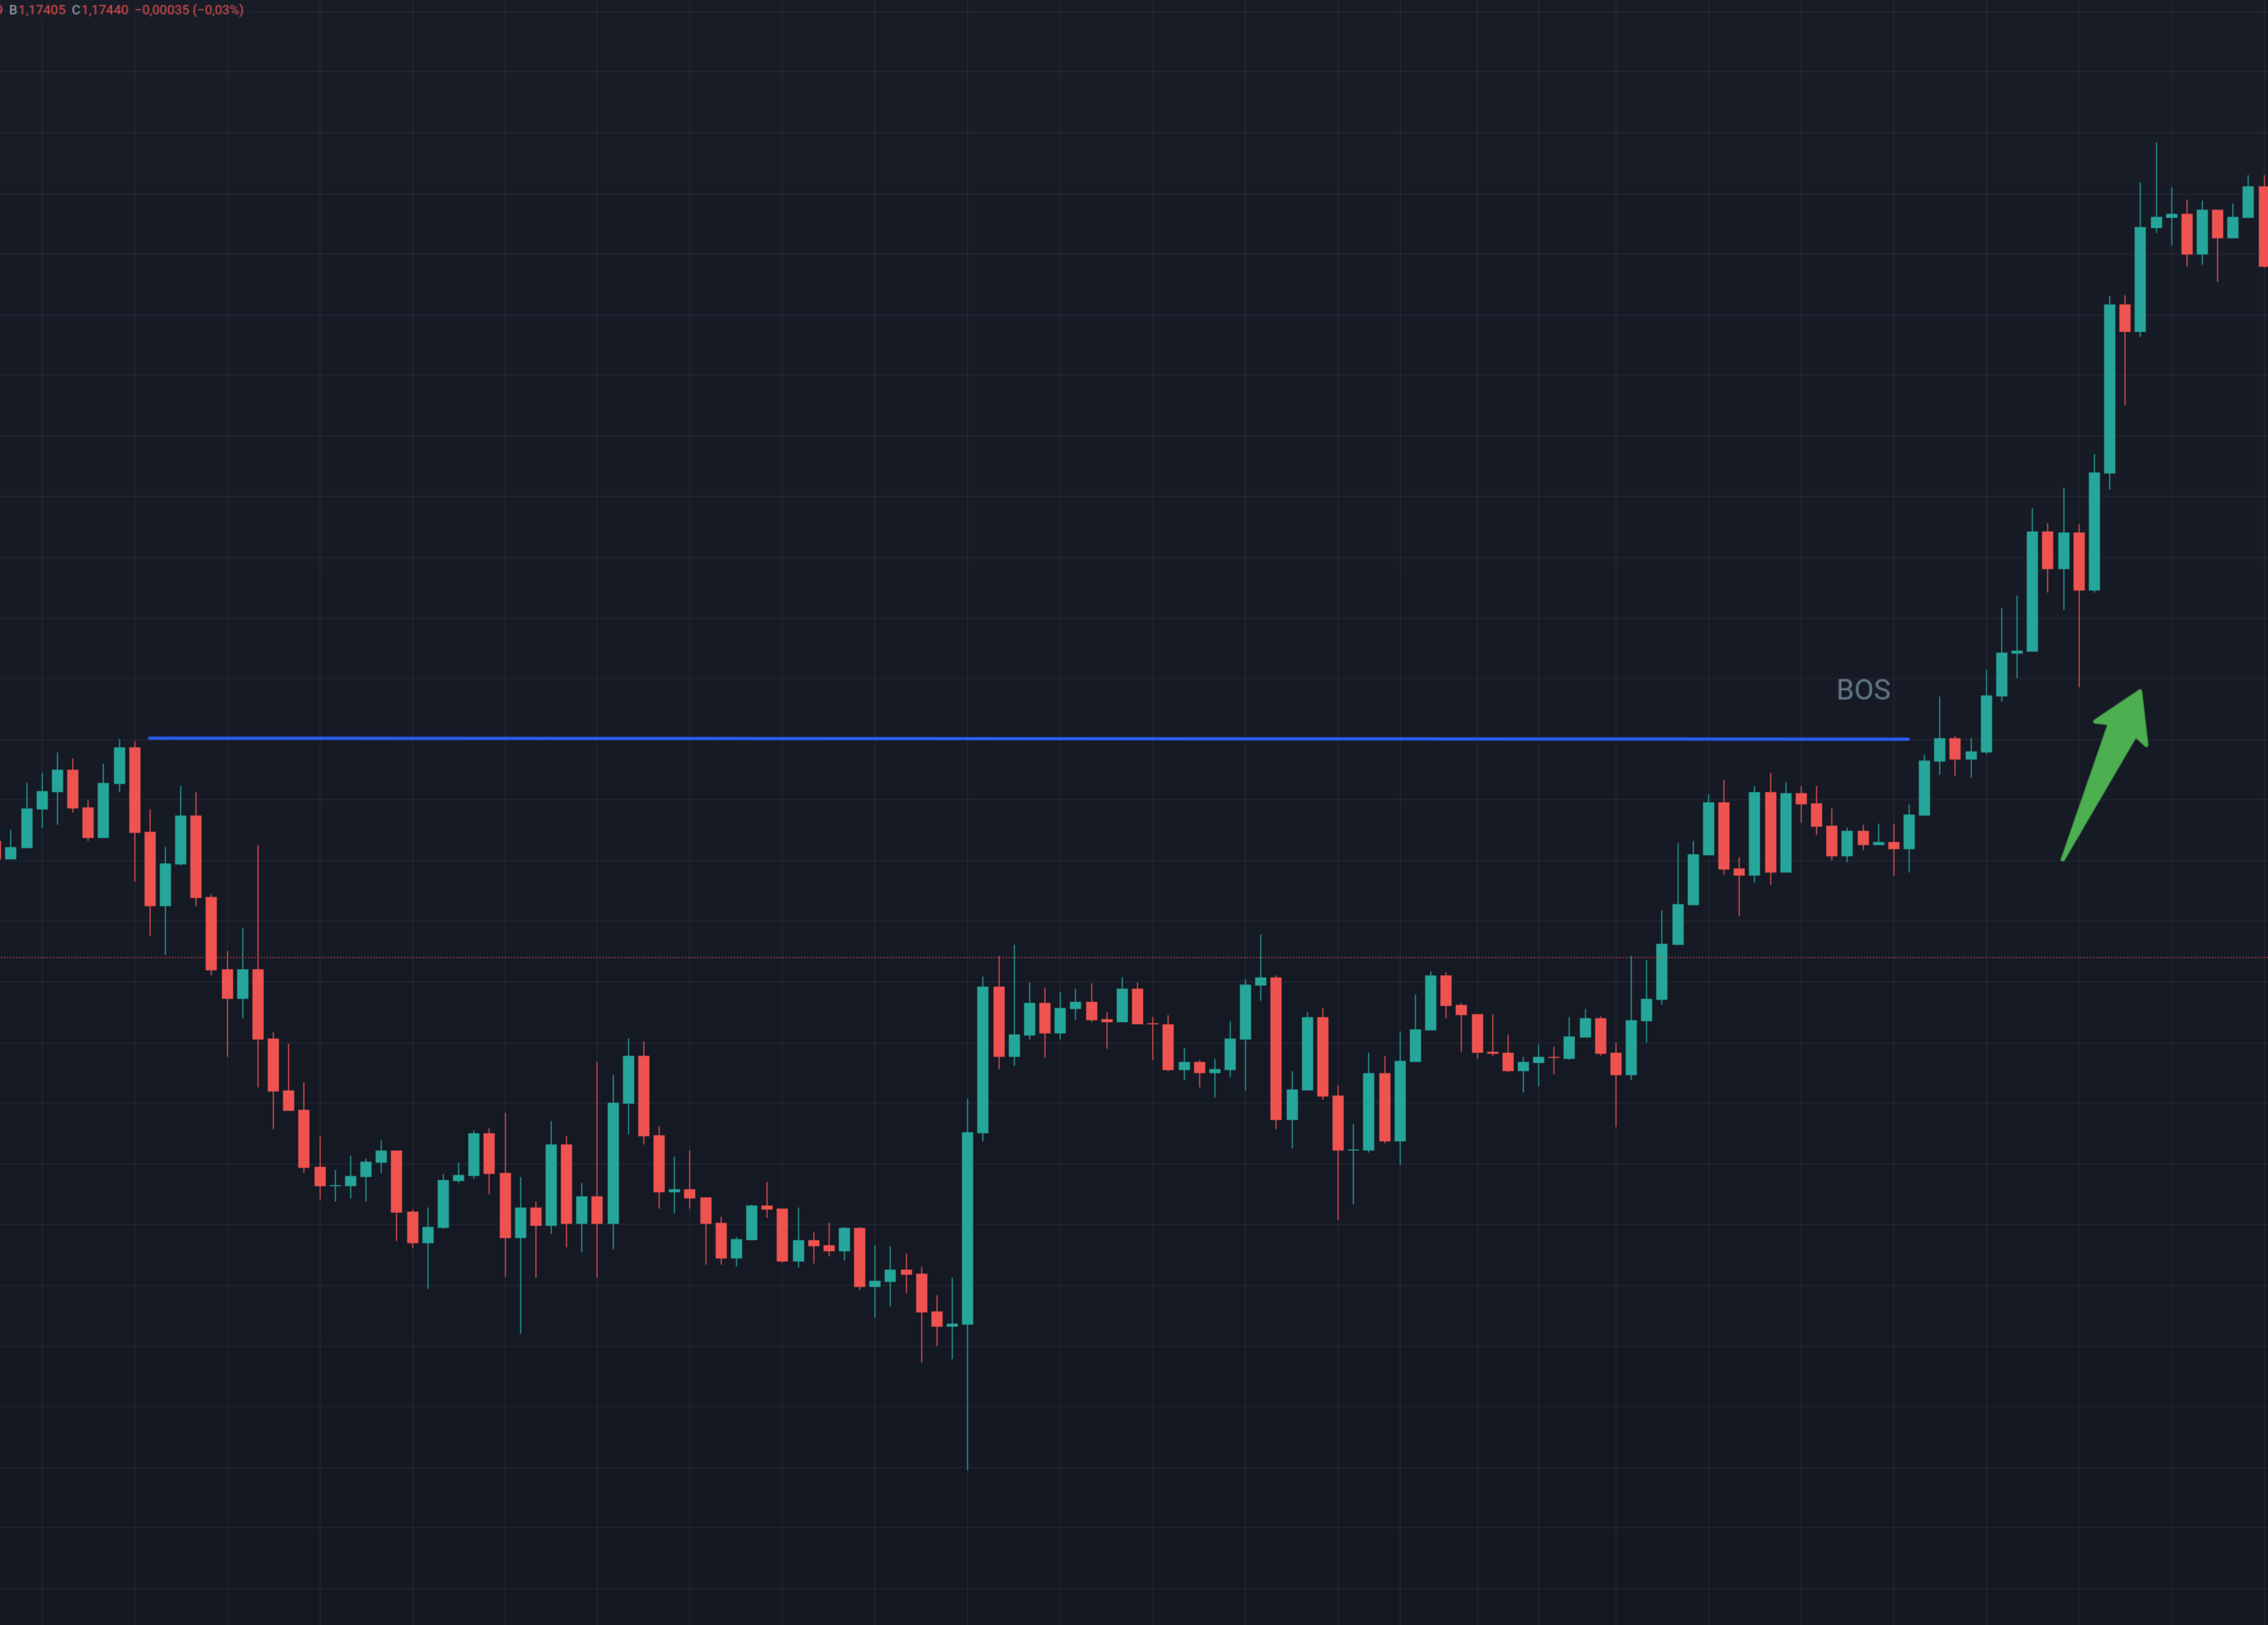
CHOCH = warning, something might be shifting.
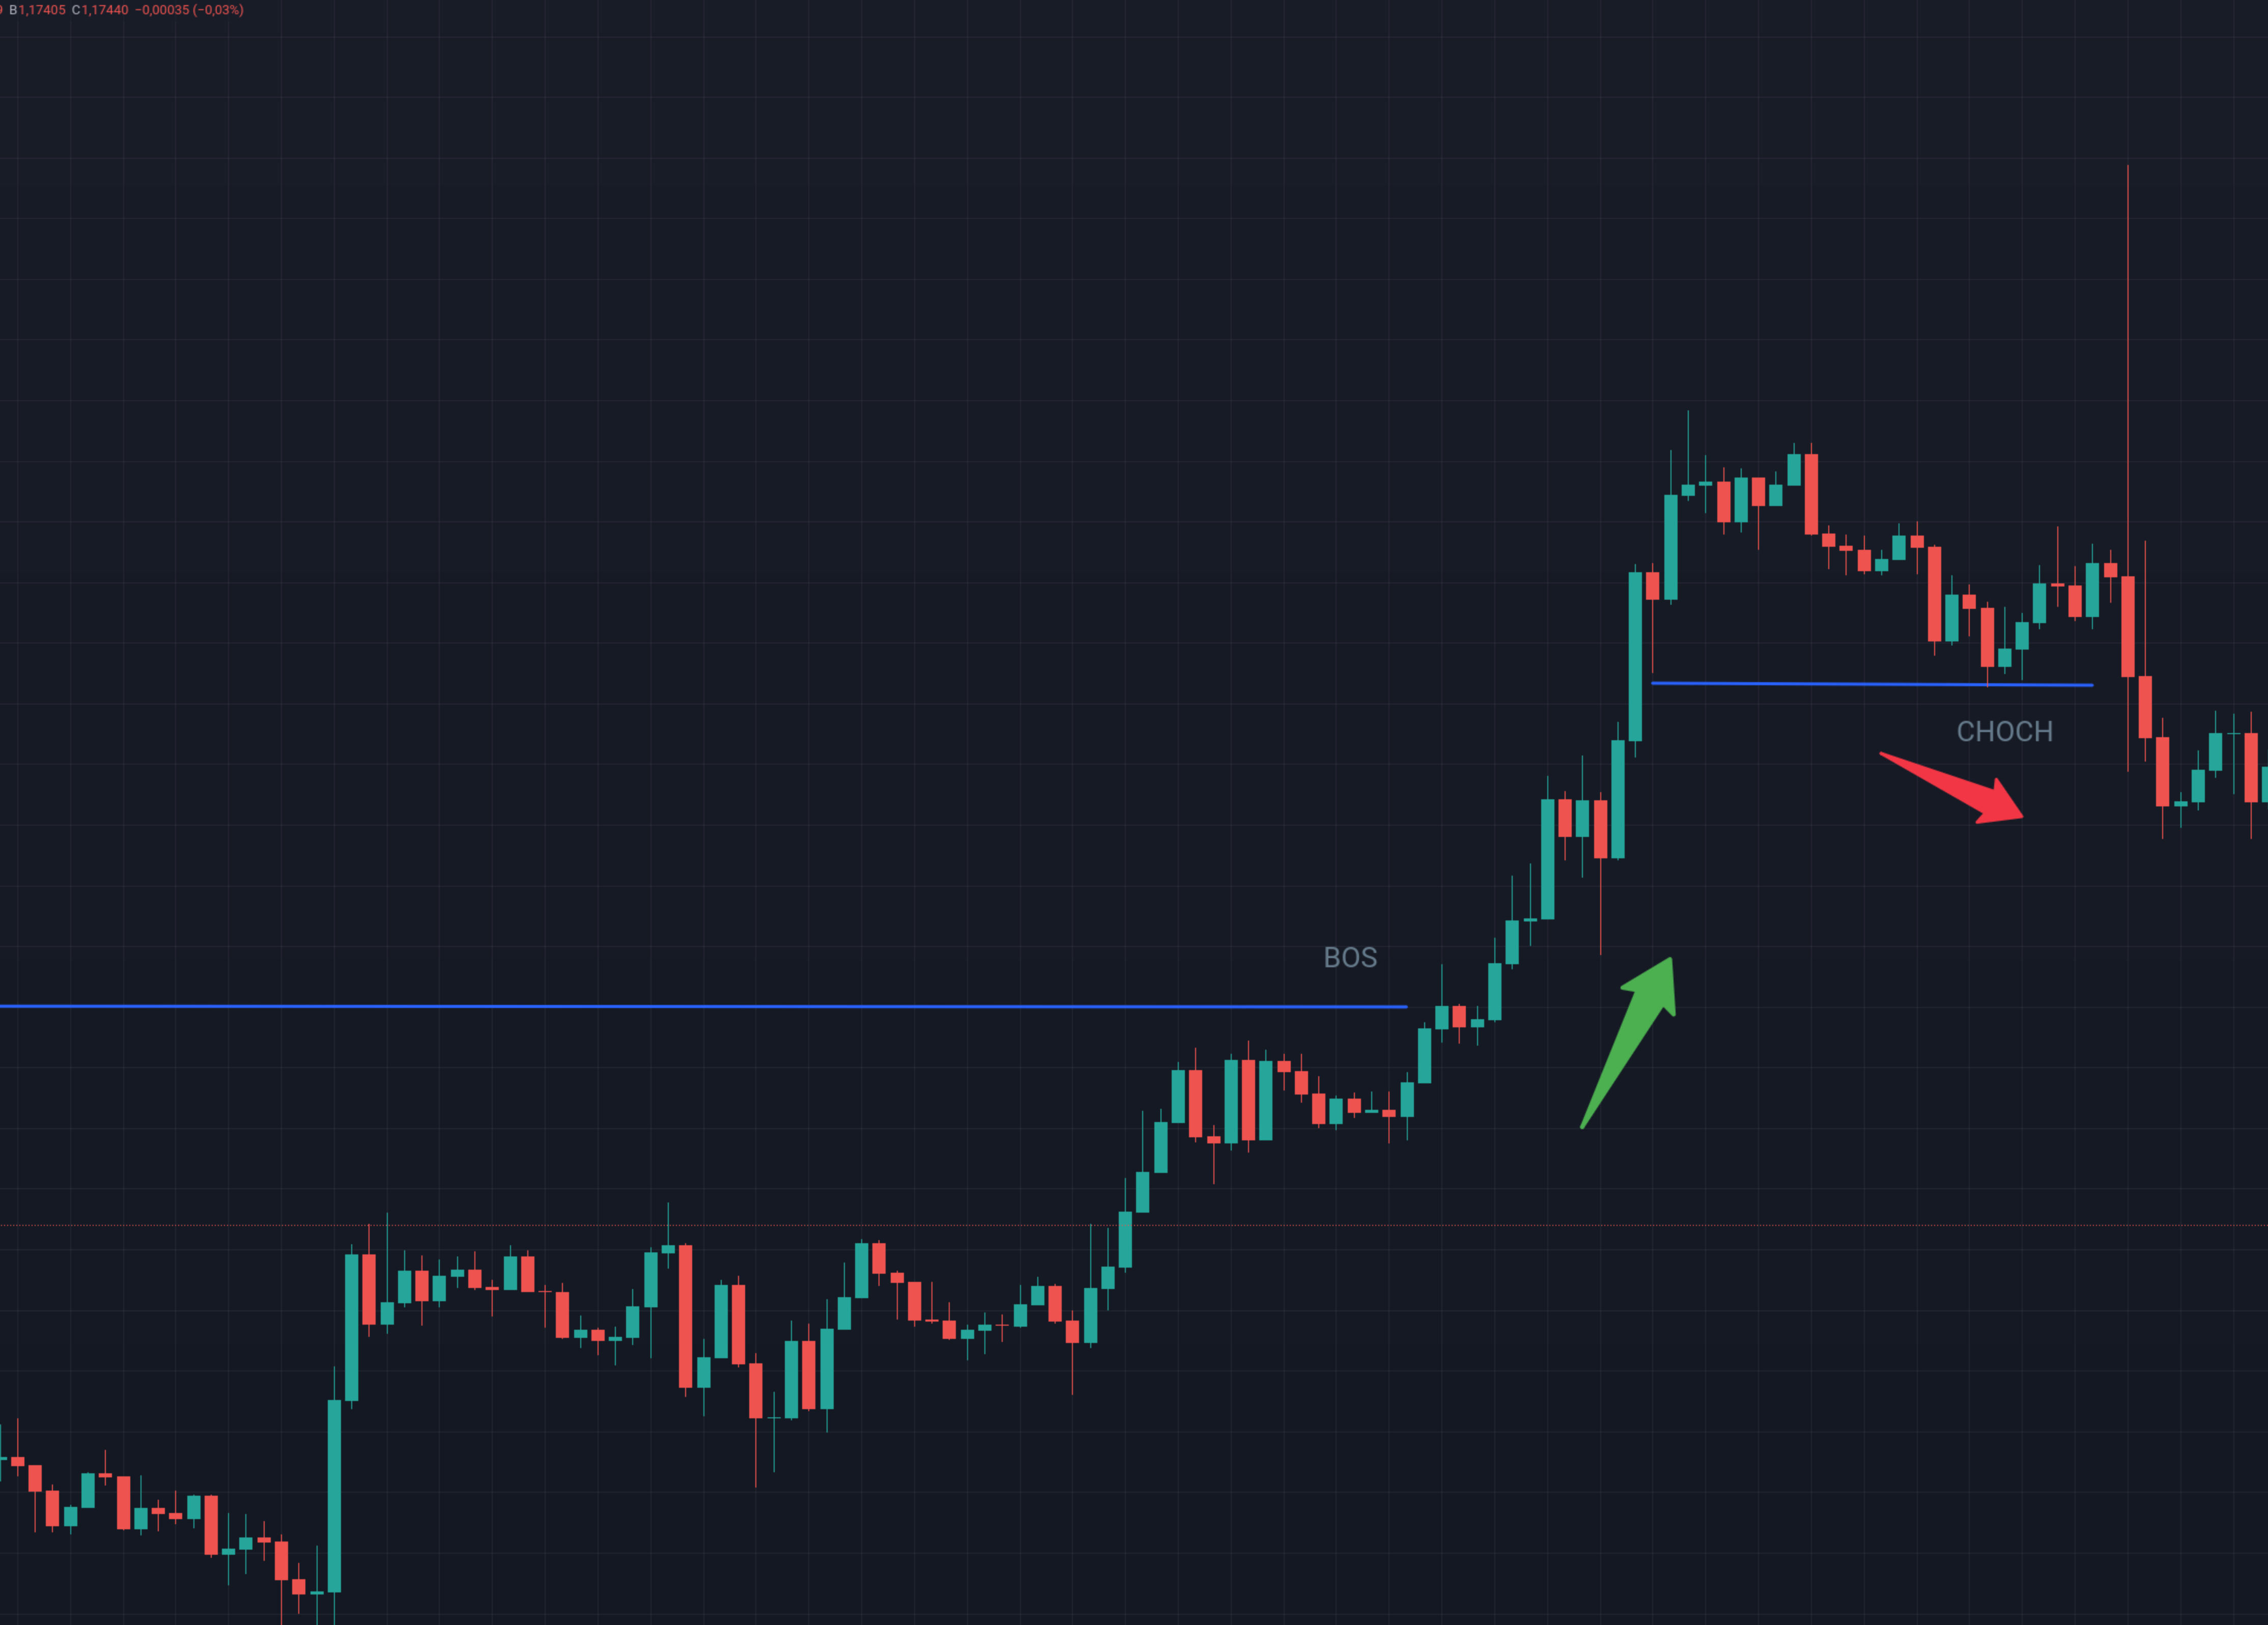
Note: A change of character does not mean the trend is over. It only warns us that momentum might be shifting. In this example, a true trend reversal would only be confirmed if price breaks below the level marked by the previous BOS.
Support & Resistance: The Classics
Support is a level where price tends to stop falling and bounce. Resistance is the opposite, a level where price often stalls and reverses.
- Support = demand area (buyers defend).
- Resistance = supply area (sellers defend).
The catch: support and resistance are not magic lines. They’re areas where participants previously fought hard. The more times price tests them, the weaker they often become.
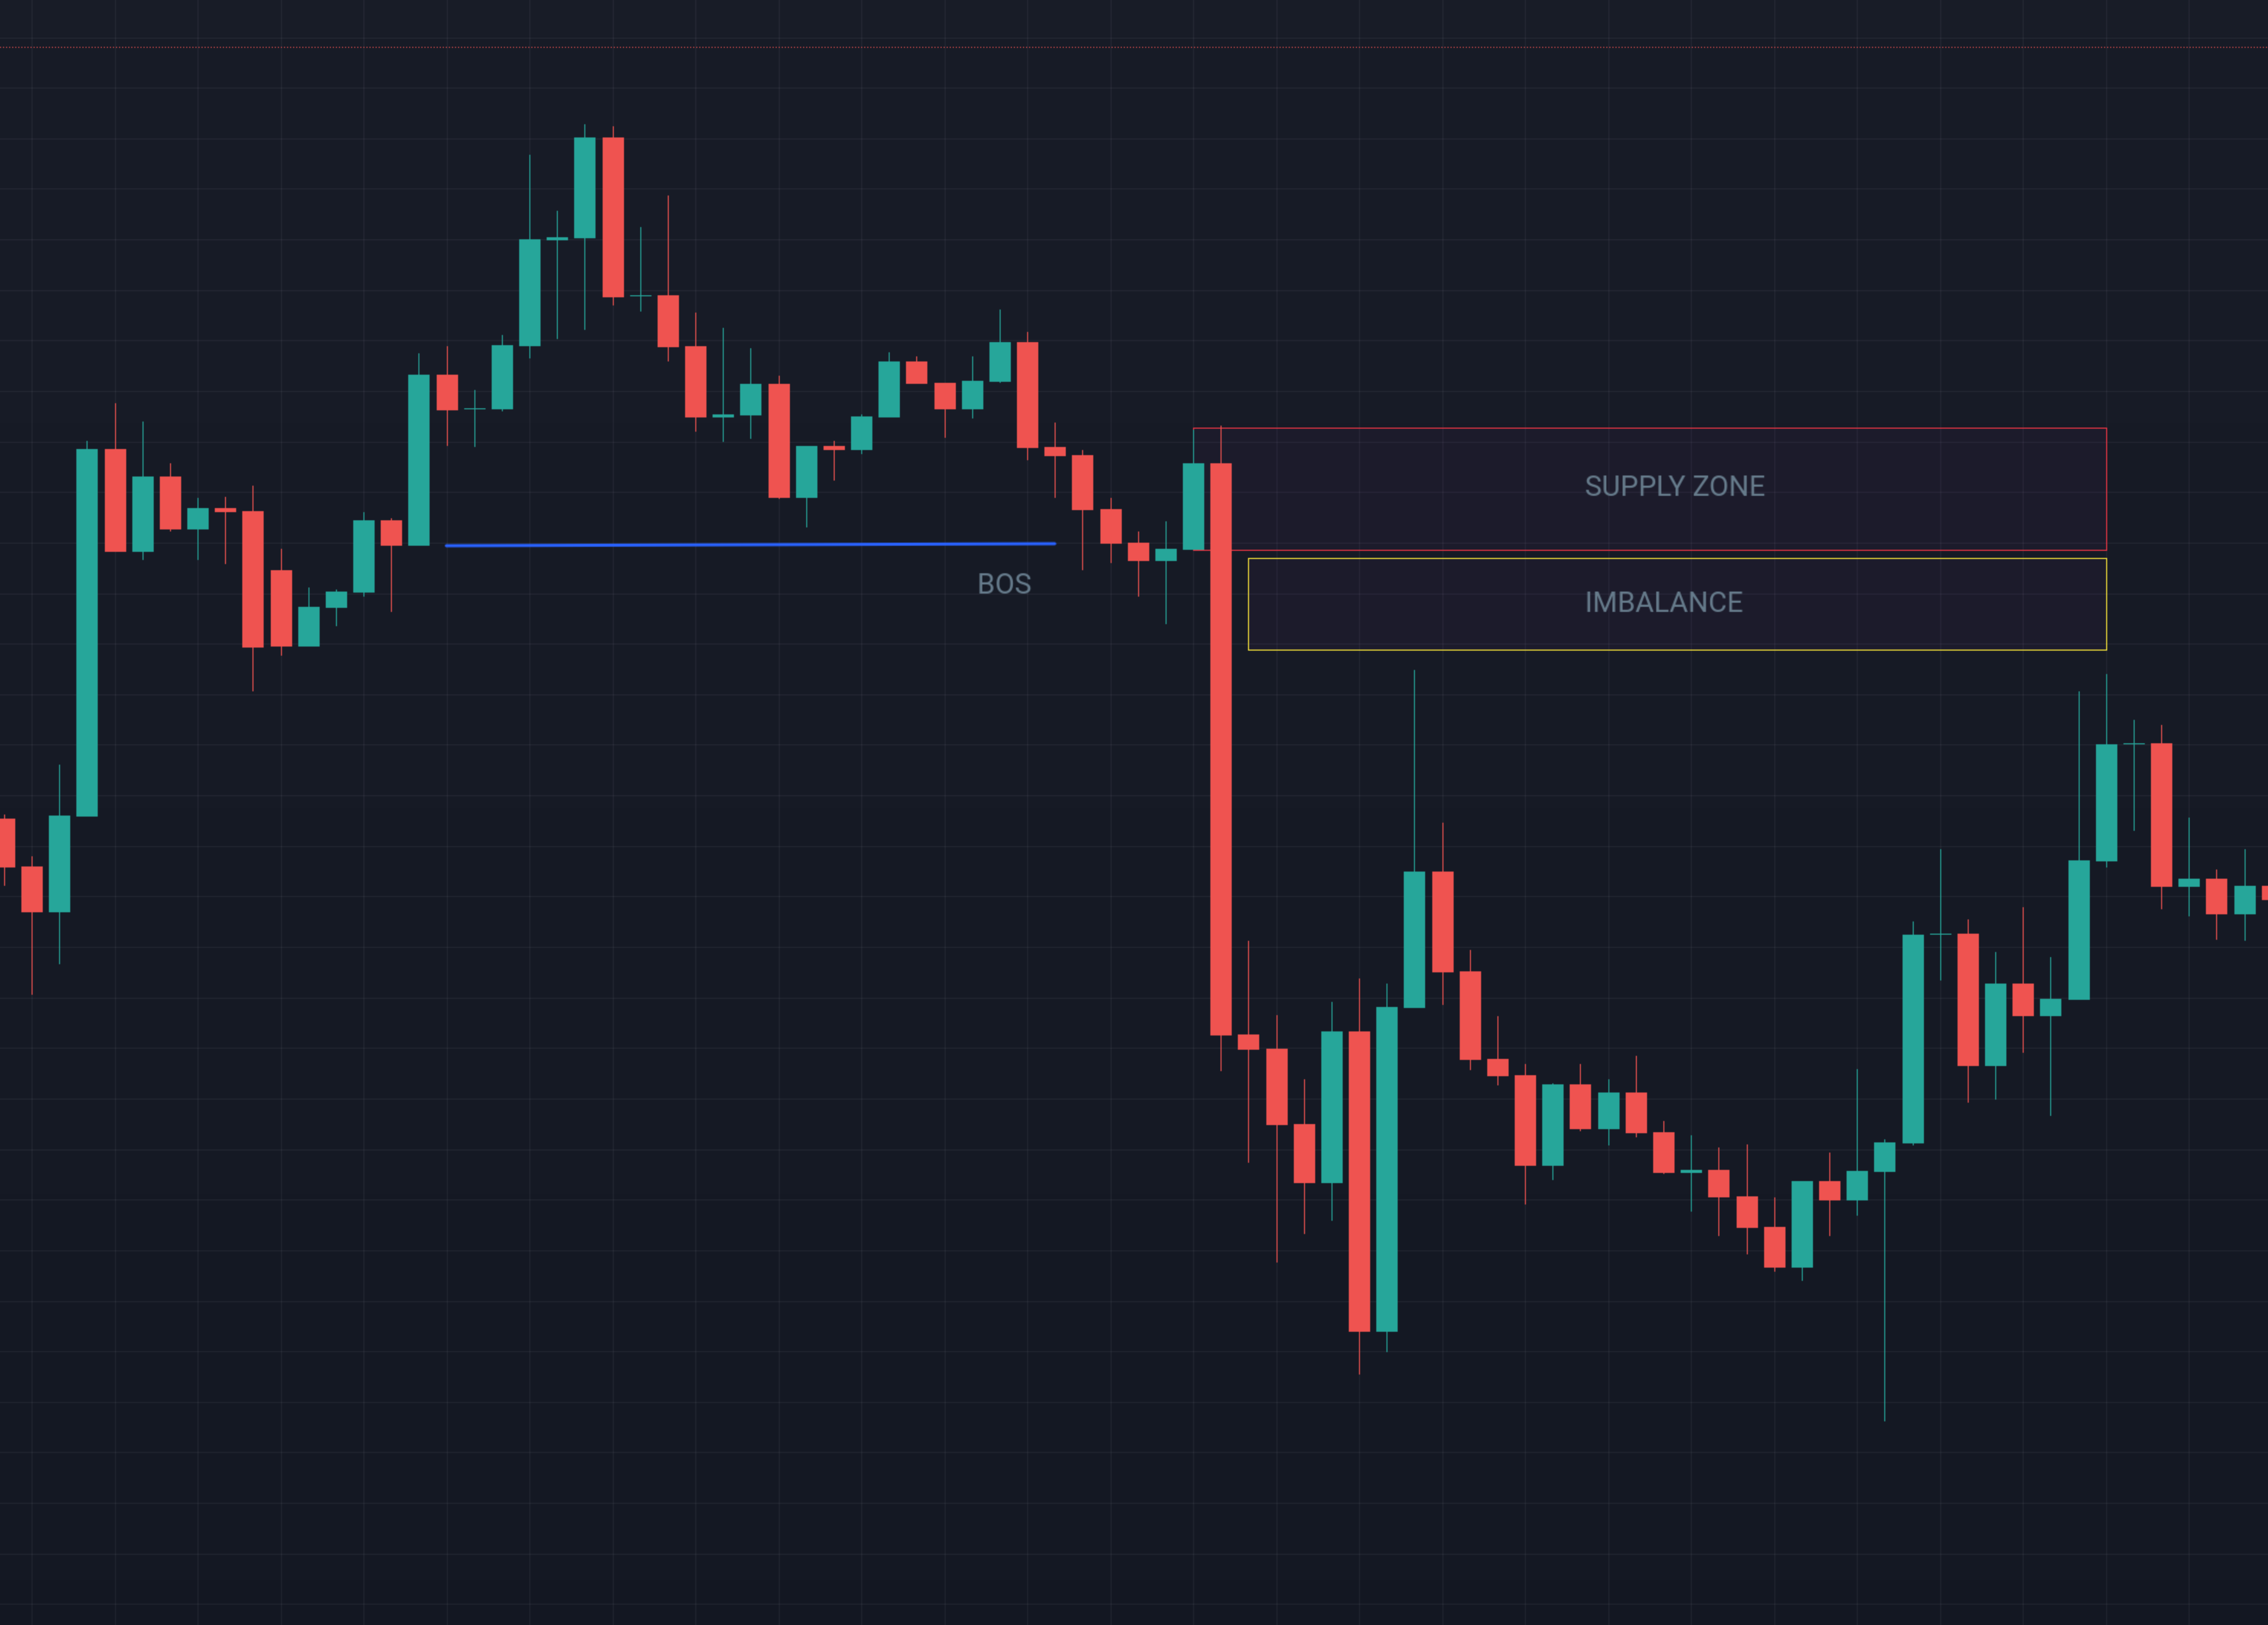
Supply & Demand Zones: The Modern Upgrade
Instead of single lines, think in zones.
- Demand zone: an area where price left strongly to the upside (more buyers than sellers -> imbalance).
- Supply zone: an area where price dropped aggressively (more sellers than buyers -> imbalance).
These zones mark where institutional orders were likely placed. When price revisits them, reactions often happen because leftover orders get triggered.
Traders have many ways to mark supply and demand zones, and that’s often why charts get messy and inconsistent. To avoid this, in Trading Brut we’ll use a simple and consistent rule:
We define the zone using the last opposite candle before the impulsive move.
This “last candle before the impulse” marks where institutional orders were likely placed. The impulse itself shows that not all orders were filled an imbalance was left behind. When price later returns to that candle’s zone, it often reacts because the remaining liquidity gets activated.
- For a demand zone, that means the last bearish candle before price shoots upward.
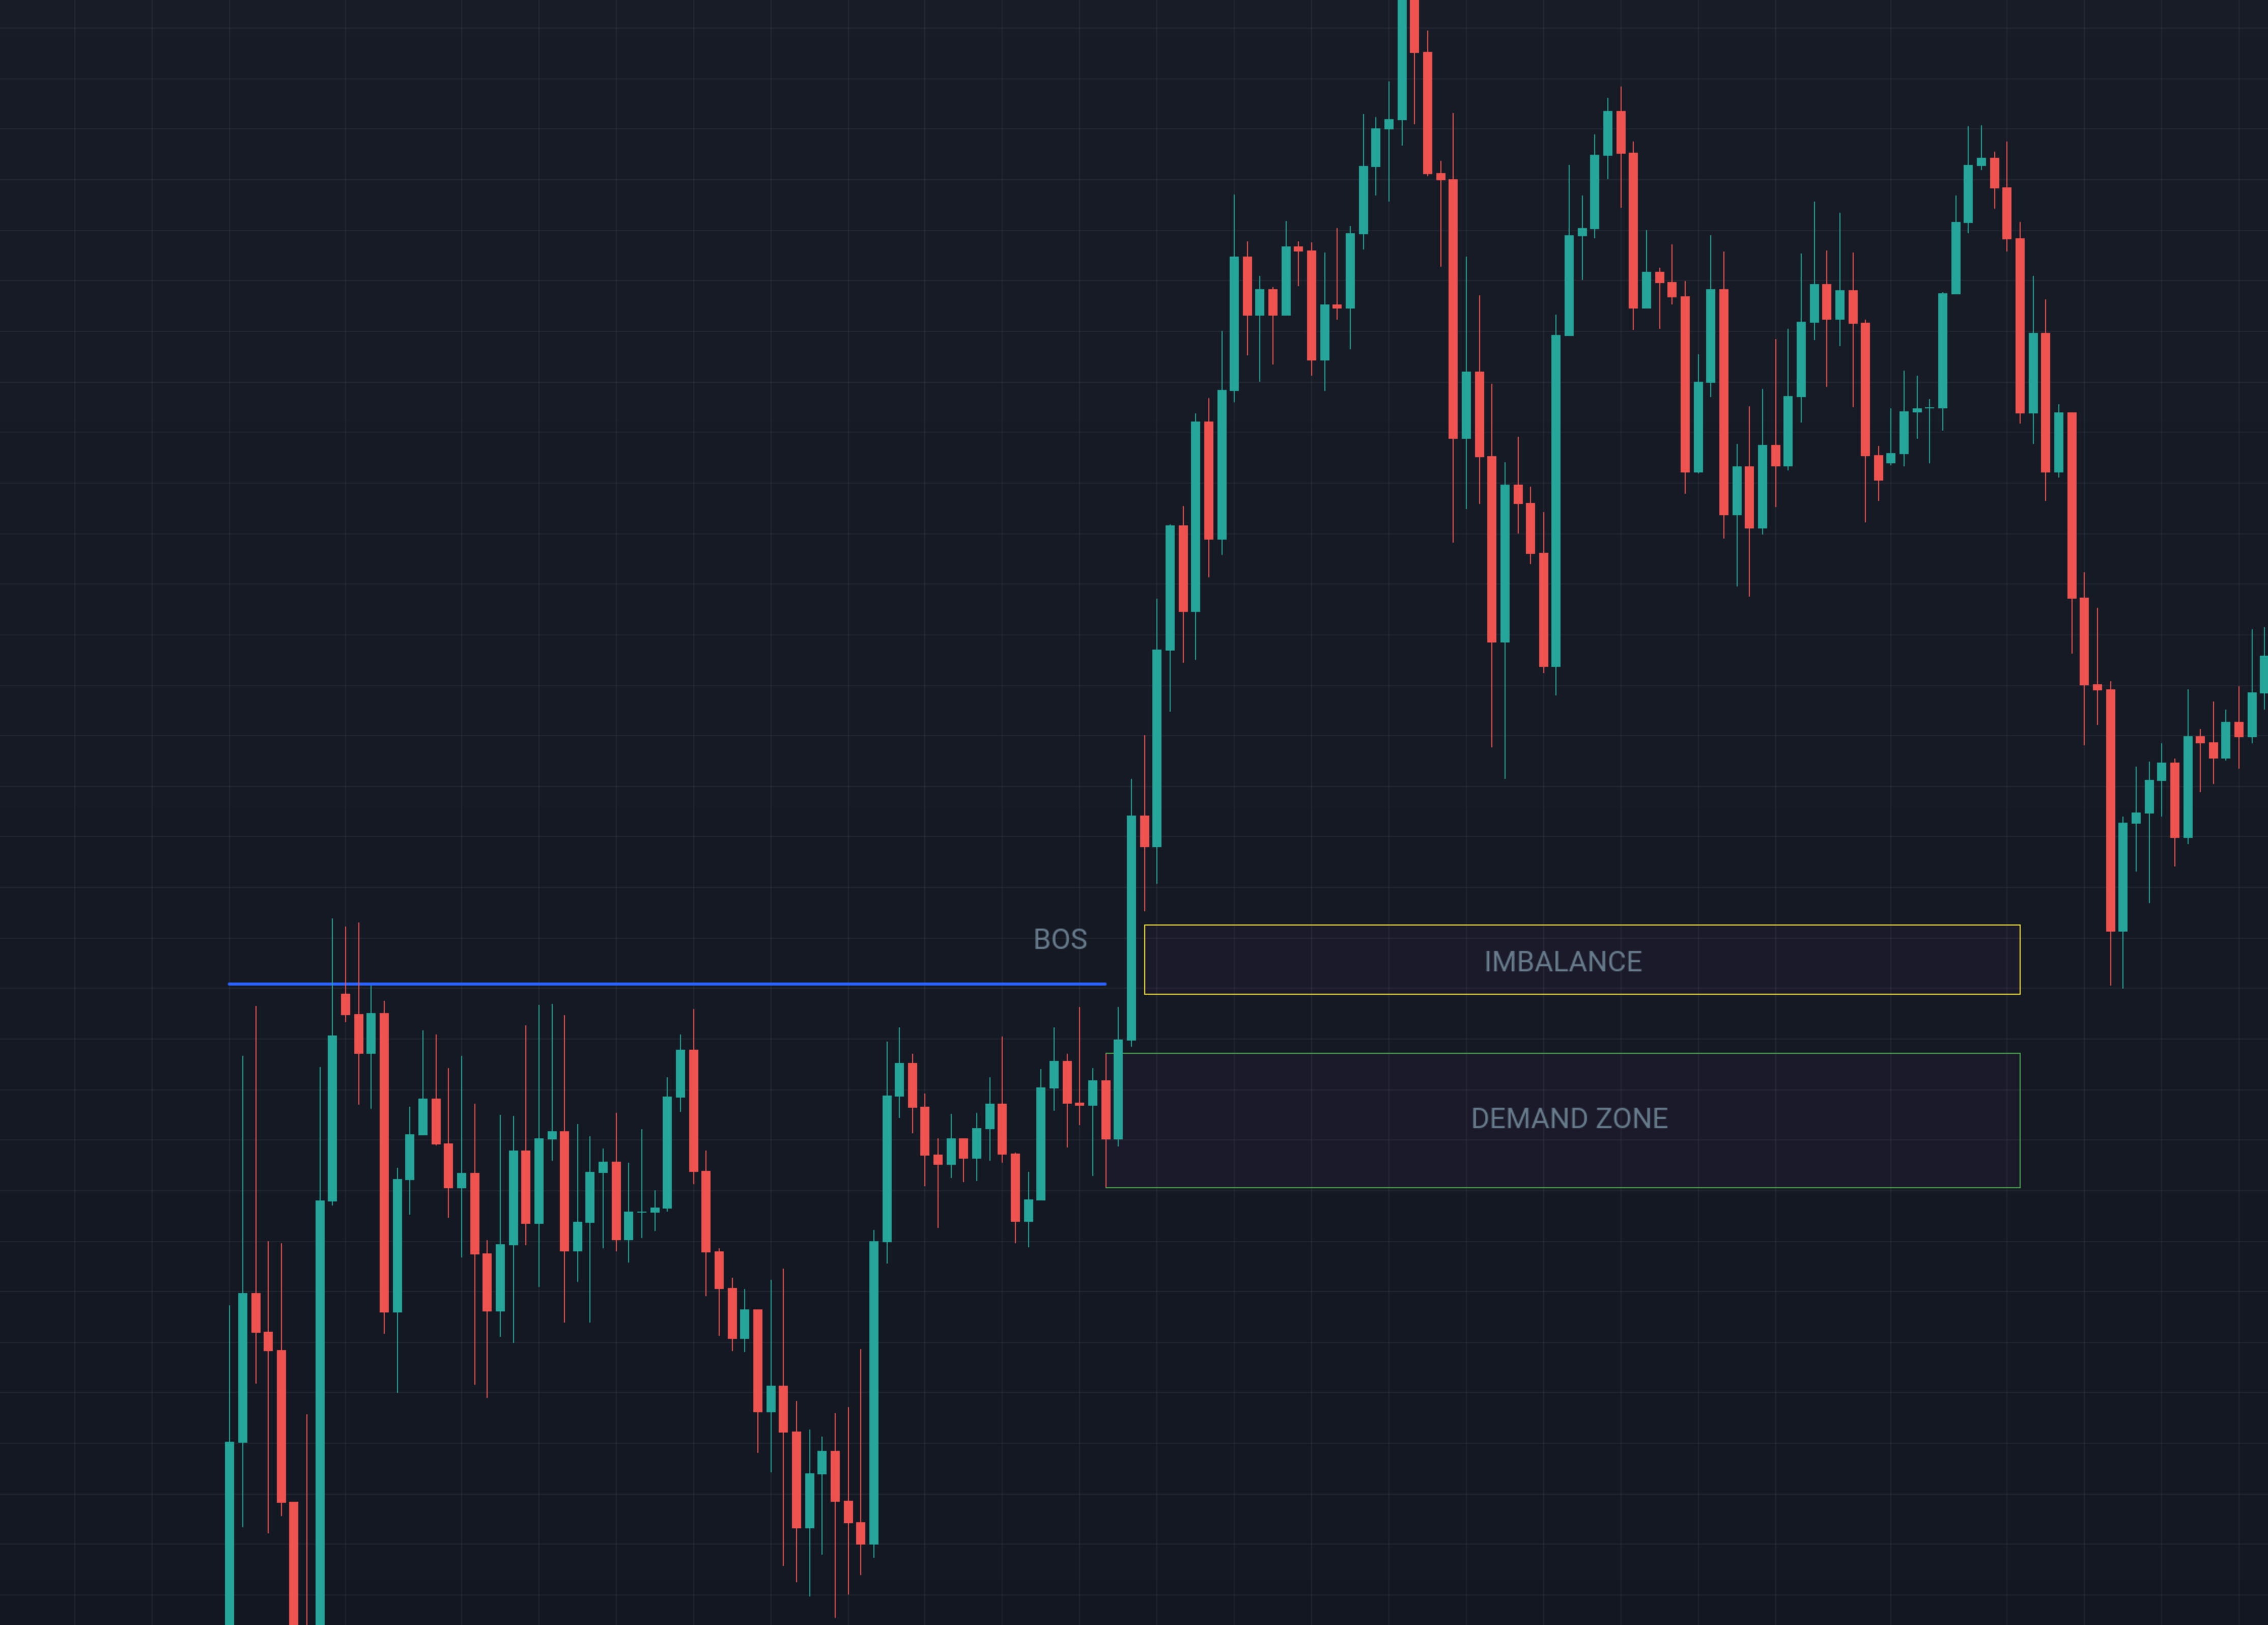
- For a supply zone, the last bullish candle before price drops aggressively.
3. Liquidity Pools: Where Stops Hide
Liquidity is the fuel of the market. Every large player: banks, institutions, even algos needs liquidity to execute their orders and liquidity doesn’t just mean “stop-losses.” It includes all forms of pending orders: stop-loss, stop entries, and limit orders.
Where these orders cluster, they form liquidity pools. And these pools act like magnets for price.
Efficient vs Inefficient Markets
- Efficient market: Price moves in balance, buyers and sellers are matched smoothly. Candles overlap, and no large gaps or imbalances are left behind.
- Inefficient market: Price moves aggressively in one direction, leaving imbalances (also called Fair Value Gaps, FVGs). These are zones where price didn’t trade efficiently because one side (buyers or sellers) overwhelmed the other.
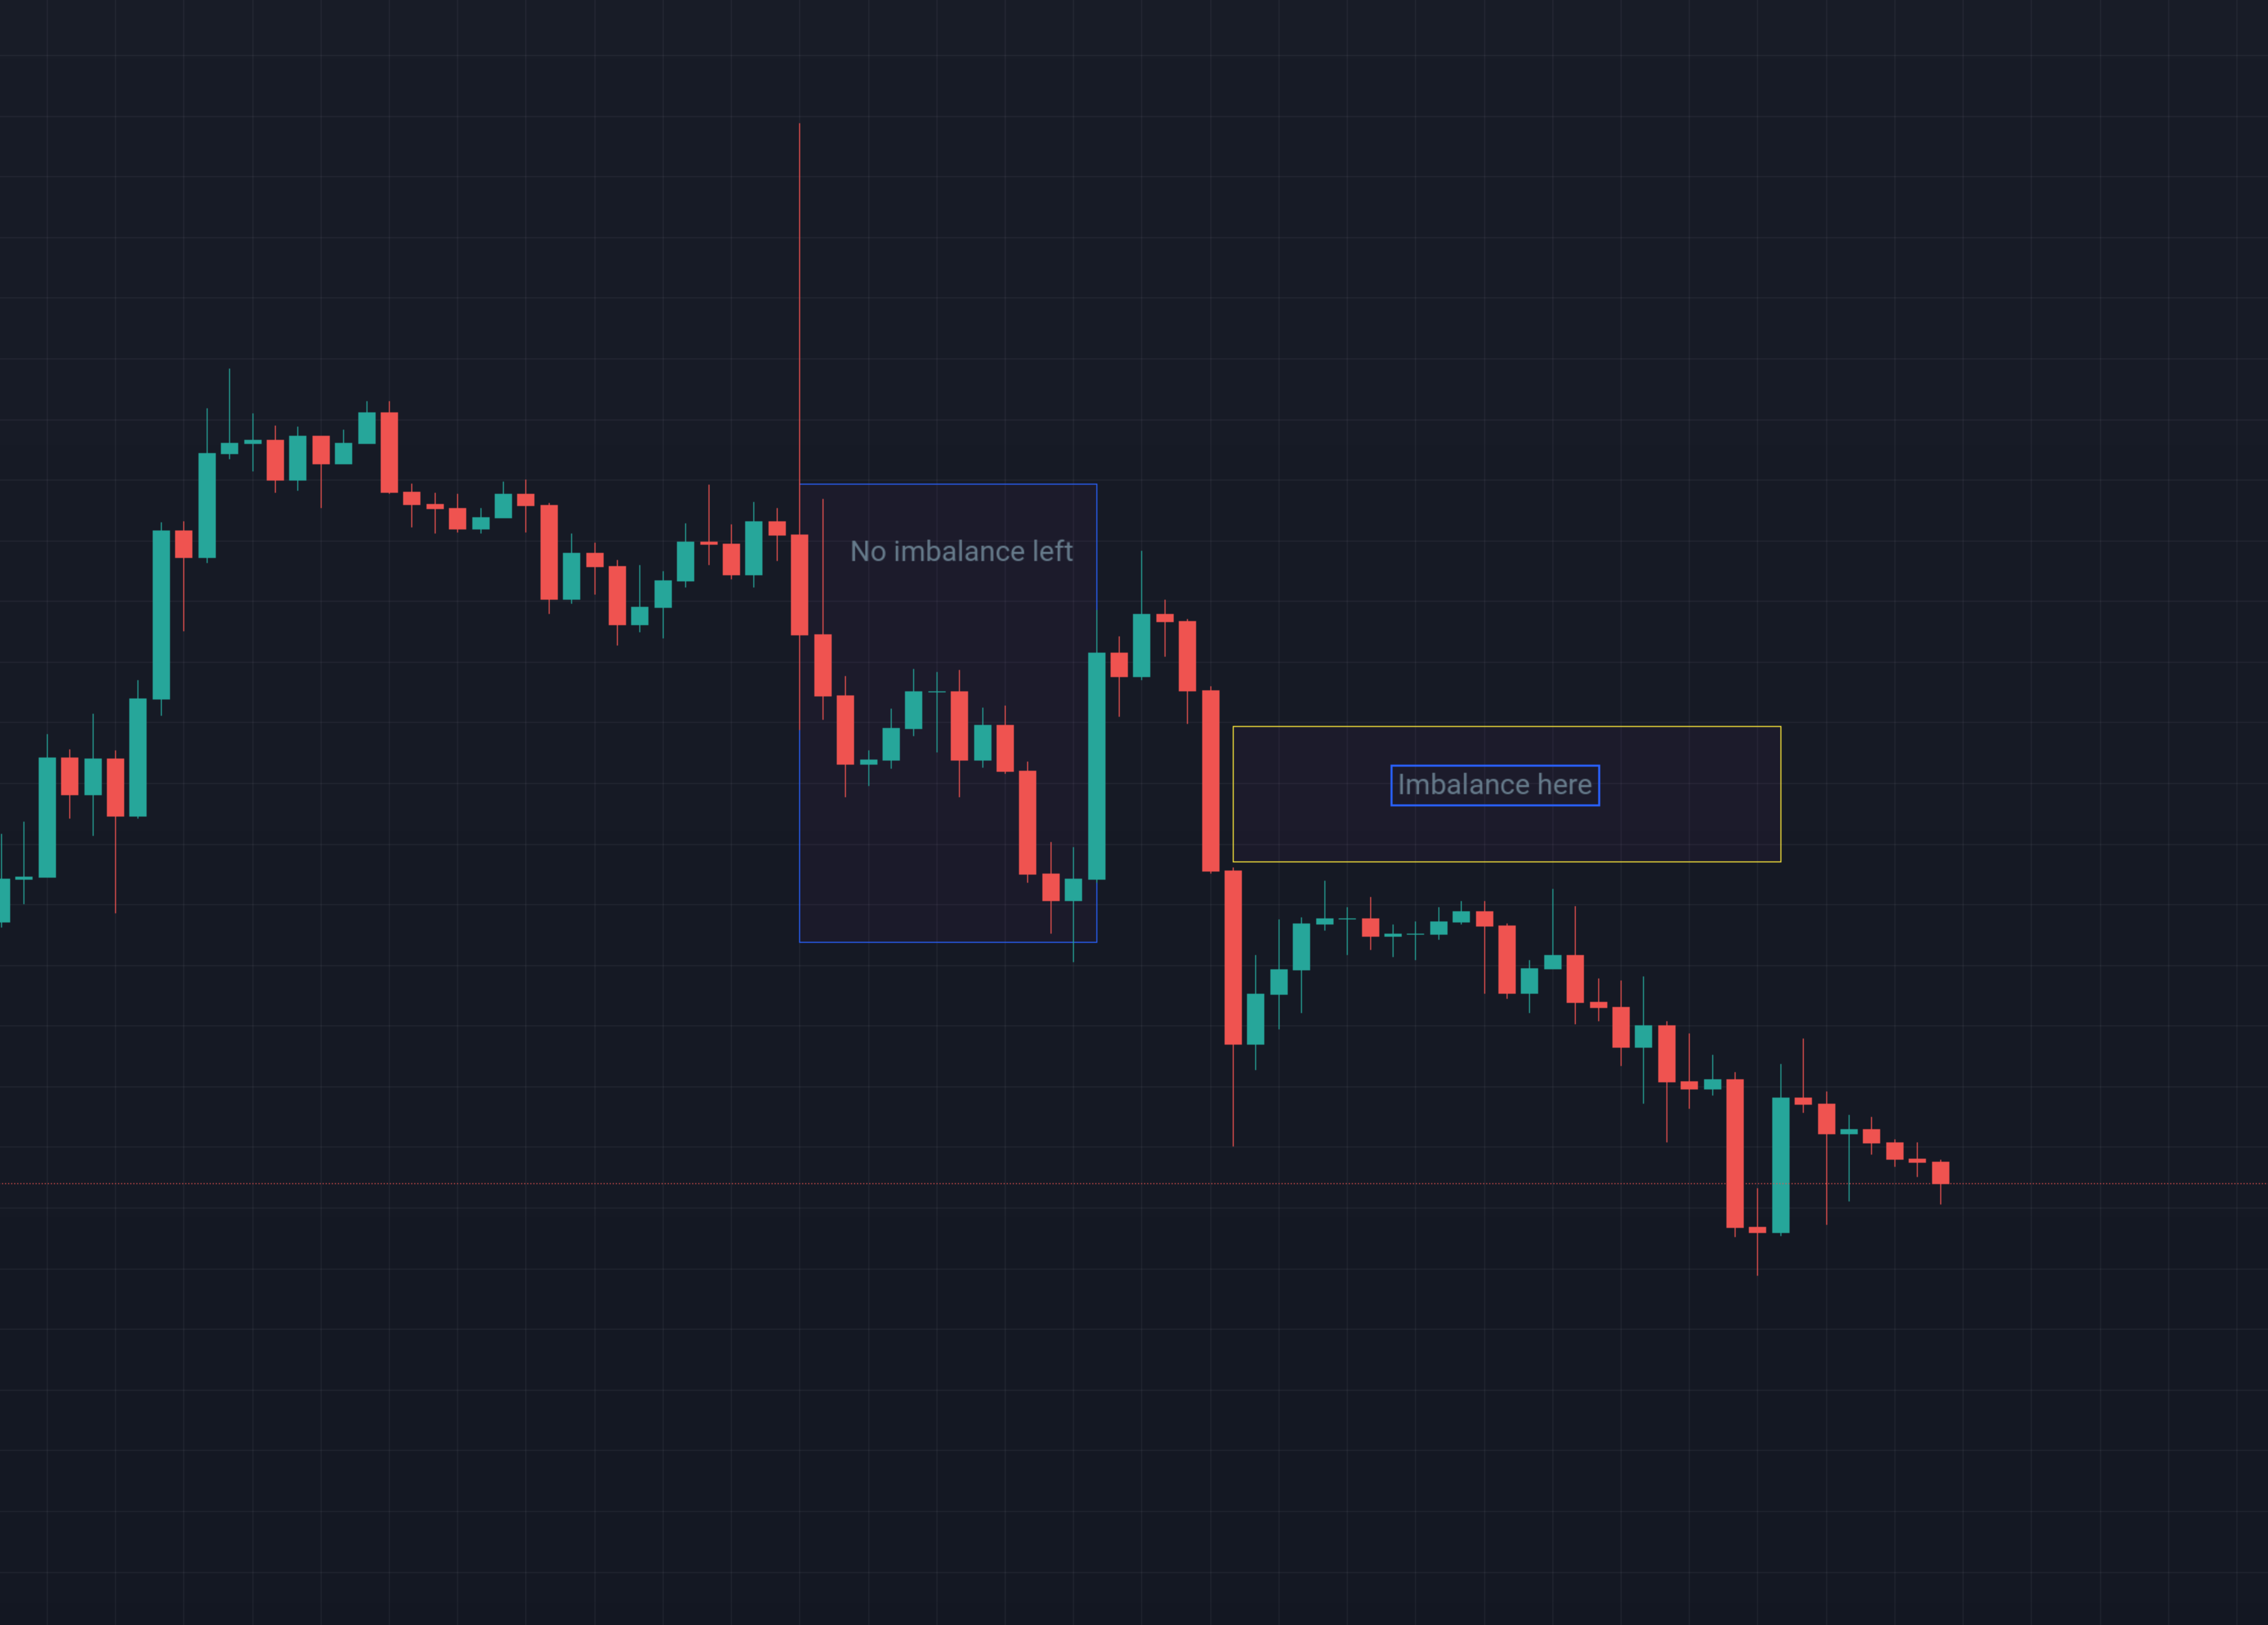
Why it matters: The market tends to come back to fill these inefficiencies, because price naturally seeks balance.
What Creates Liquidity Pools?
Liquidity pools form where orders accumulate. These can be:
- Stop-loss orders: sitting above highs or below lows. Once triggered, they become market orders.
- Stop orders (buy stop / sell stop): breakout traders place them above resistance or below support, waiting to enter on momentum.
- Limit orders (buy limit / sell limit): often used by institutions to enter at favorable prices inside supply/demand zones.
All of these create pockets of liquidity that bigger players hunt to fuel their positions.
Internal vs External Liquidity
Not all liquidity is equal. Traders need to distinguish between internal and external liquidity:
- Internal Liquidity (inside the range):
Stops and orders sitting around minor swing highs/lows within a broader structure.
Example: price consolidates inside a range. Small highs/lows inside that range hold liquidity that can be swept before the real breakout. - External Liquidity (outside the range):
Stops and orders clustered above the range high or below the range low.
Example: equal highs at the top of a range. Liquidity builds as breakout traders place buy stops above, while short traders place stop-losses there. Institutions often sweep this external liquidity before reversing.
Internal = the noise inside the box.
External = the big pools just outside the box.
Institutions love to grab internal liquidity first (clearing weak hands inside the range), then move toward external liquidity (where the bigger pools sit).
How Price Uses Liquidity
- Price ranges → internal liquidity builds at small swings.
- Price spikes to clear internal liquidity.
- Price then targets external liquidity (the obvious highs/lows).
- On the way, if an imbalance exists, price often retraces to fill it.
This cycle repeats over and over accumulation of orders, sweep of liquidity, fill of inefficiencies, continuation or reversal.
Practical takeaway: Liquidity is not just about stop-loss hunting. It’s the sum of all pending orders stops, limits, entries — clustered in predictable places. By learning to read internal vs external liquidity and combining it with imbalances, you’ll start to see why price goes to certain levels before making its real move.
4. Phases of the Market
Markets don’t move randomly. They follow repeating phases, each with its own psychology, liquidity traps, and structural clues. If you can read these phases, you stop chasing noise and start anticipating what’s coming next.
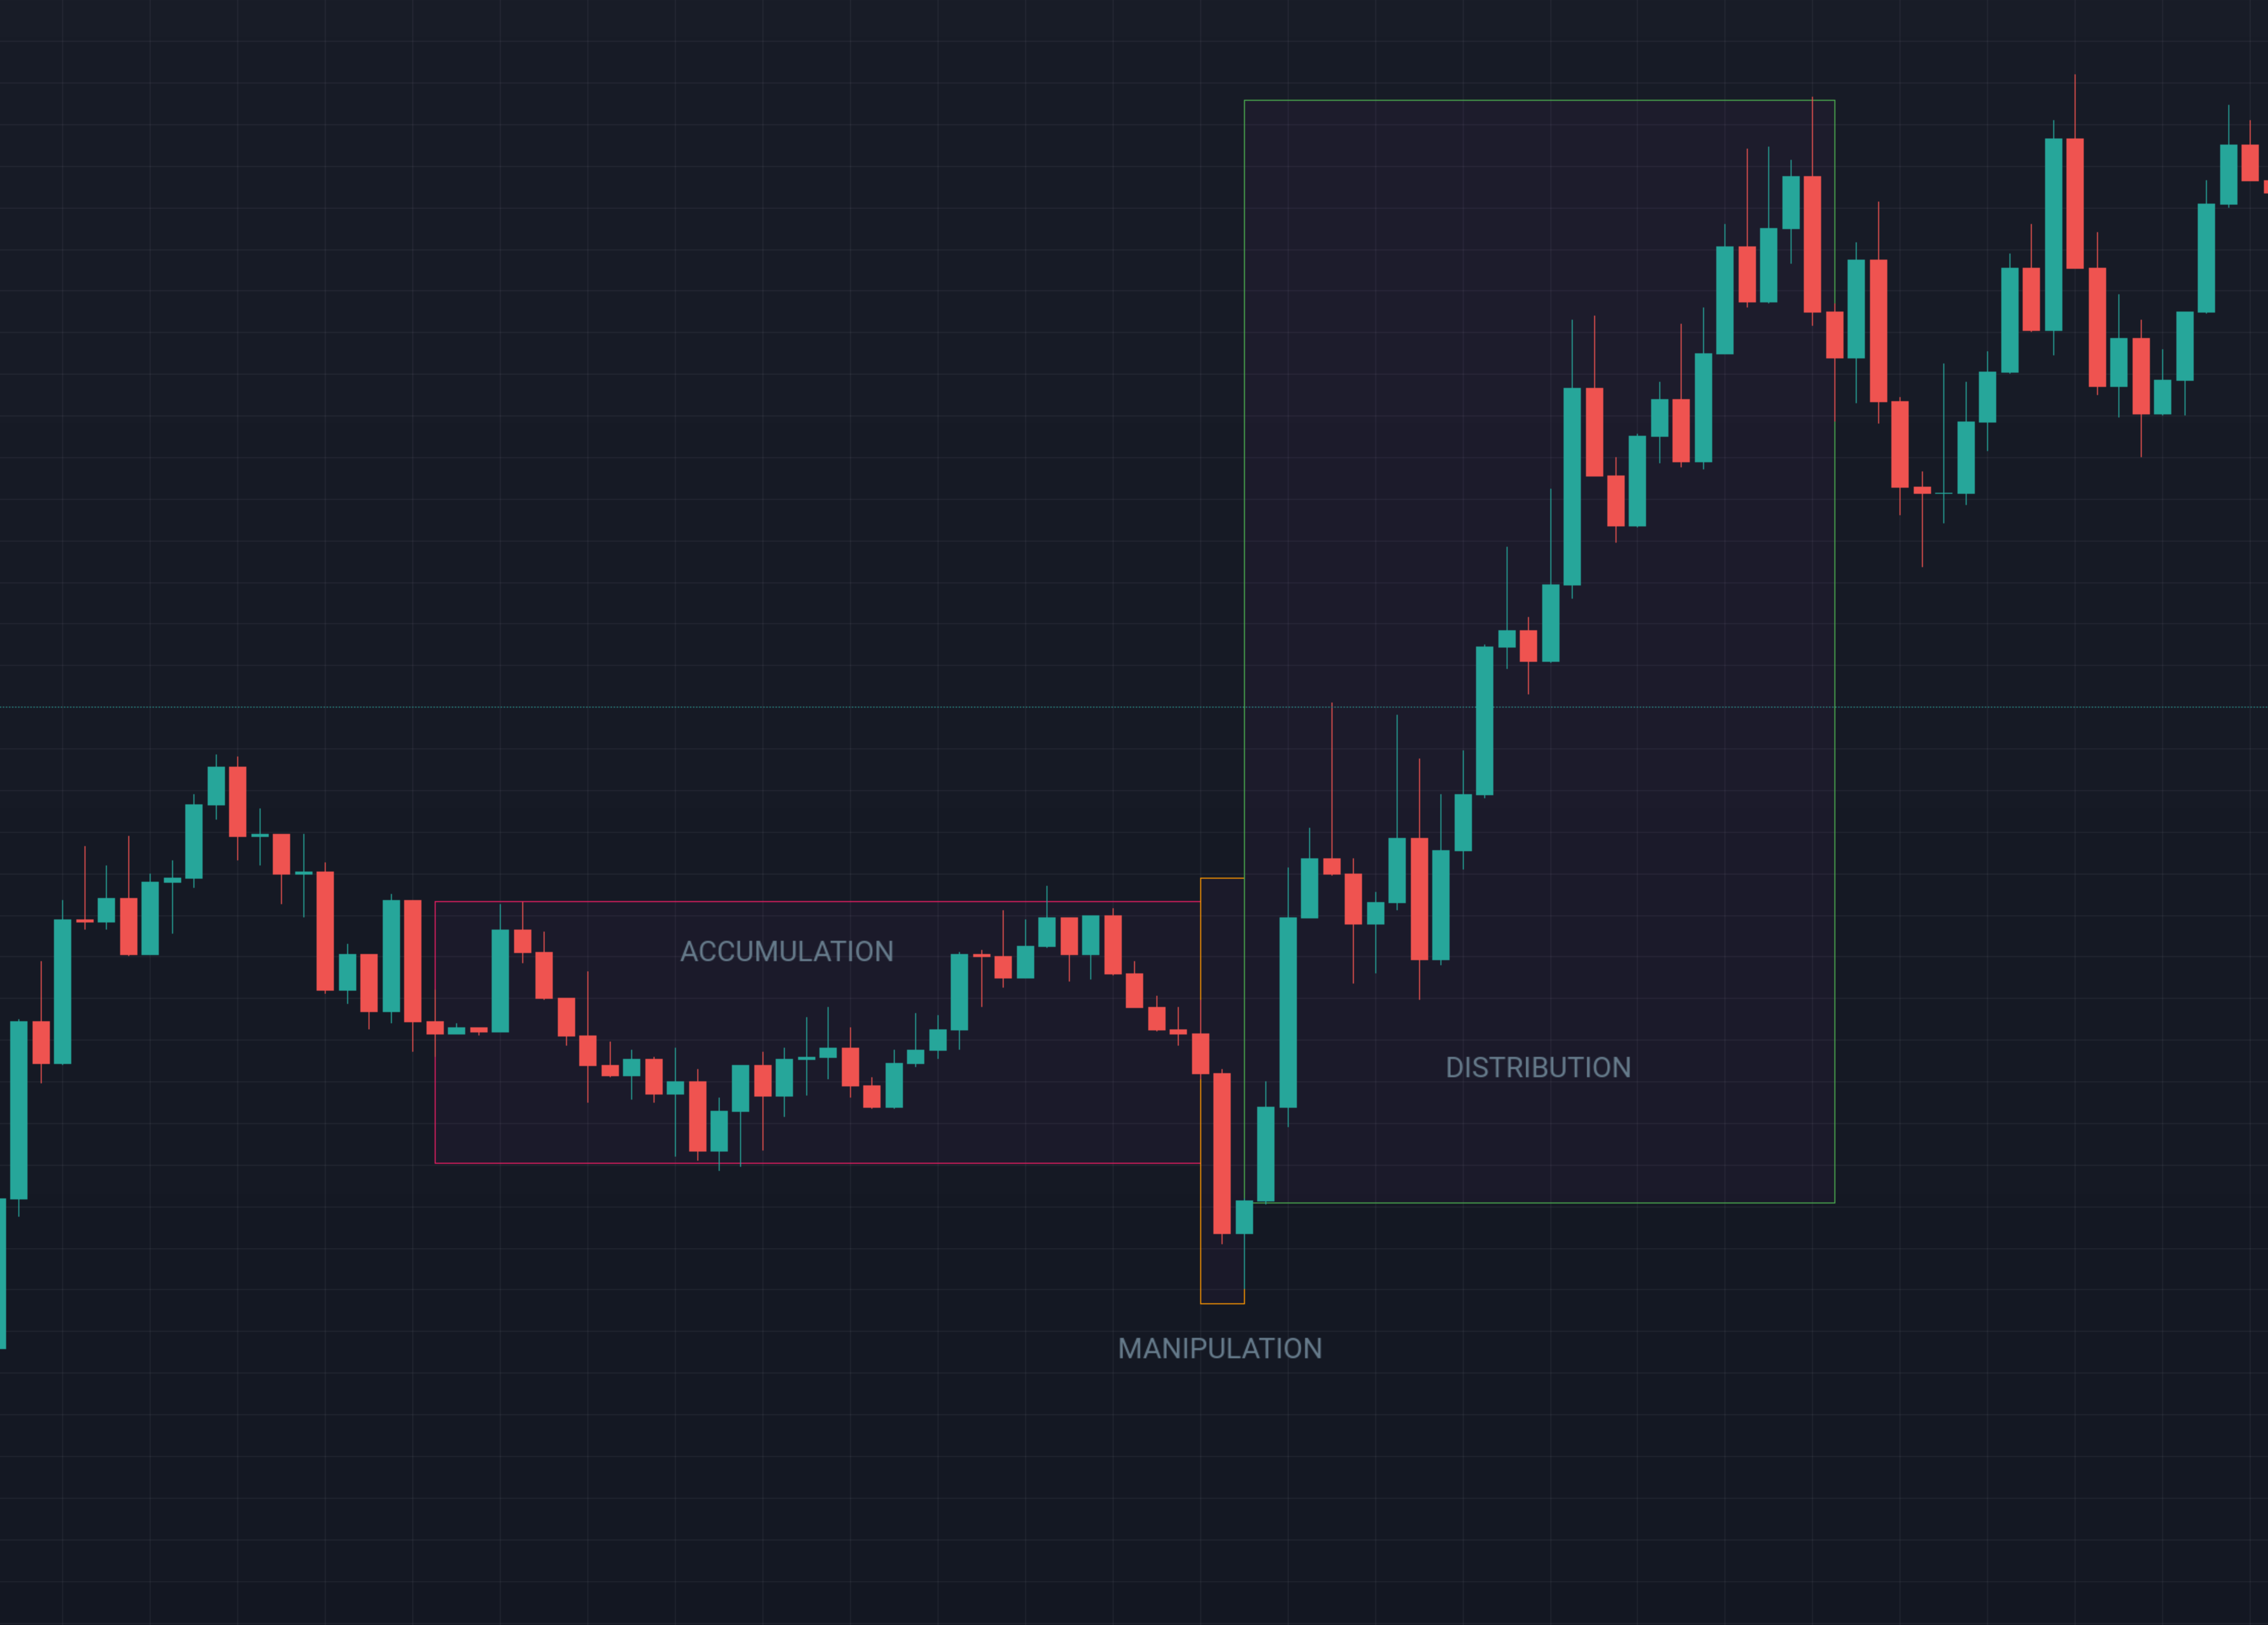
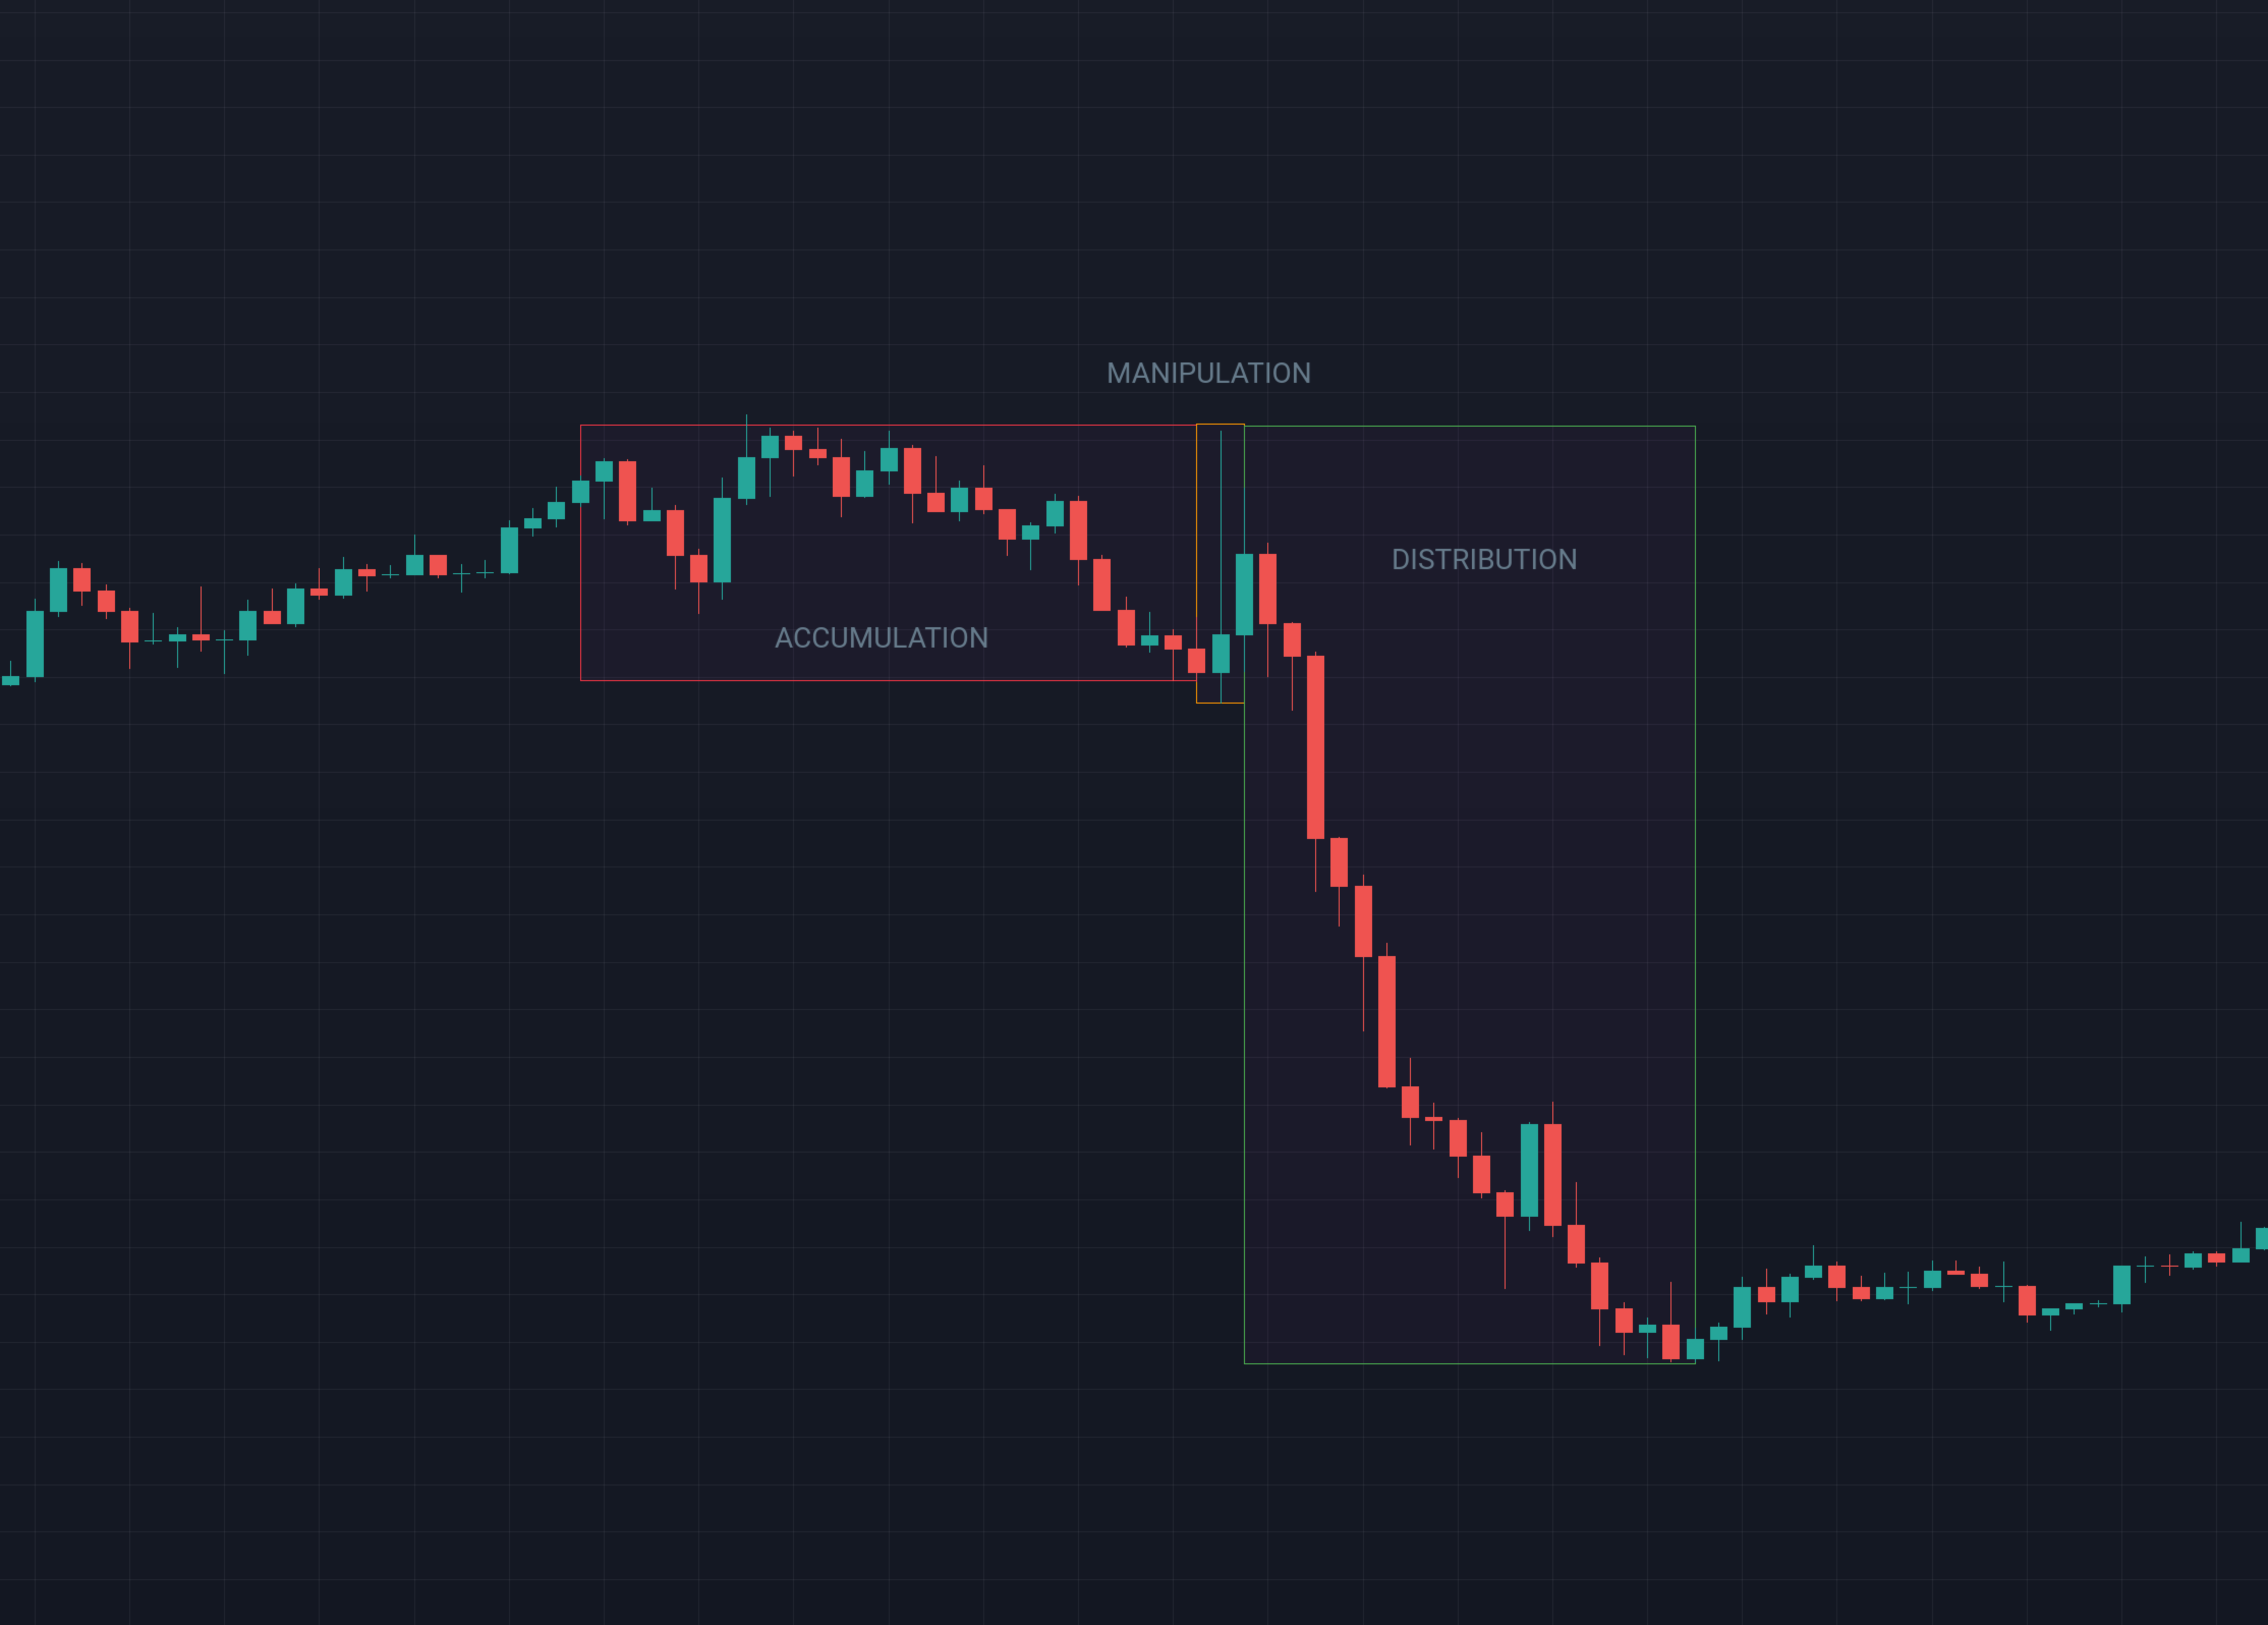
We’ll use a framework you’ve already heard about: Accumulation → Manipulation → Distribution (AMD).
Accumulation: Building the Trap
- What happens: Price moves sideways, creating a range. Liquidity builds inside (internal liquidity) and above/below the range (external liquidity).
- Who’s involved: Institutions quietly accumulate positions while retail traders get chopped up in the sideways mess.
- Clues:
- Equal highs/lows forming.
- Low volatility, tight structure.
- Volume drying up (in futures/stocks).
- Psychology: Retail traders get impatient, overtrade the range, or assume “nothing is happening.” In reality, this is where the next big move is loading.
Manipulation: Clearing the Table
- What happens: Price suddenly sweeps liquidity. It spikes above the range high or below the range low, triggering stop-losses, breakout traders, and pending orders.
- Who’s involved: Institutions use this fake move to fill their large orders at the best price.
- Clues:
- Sharp, aggressive move grabbing external liquidity.
- Often leaves behind an imbalance (inefficient market).
- Usually fast and emotional — traders feel FOMO or panic.
- Psychology: Retail longs or shorts get trapped. Many chase the breakout just as it’s about to reverse.
Distribution: The Real Move
- What happens: After liquidity has been collected, price moves decisively in the intended direction. This is the true trend institutions wanted from the start.
- Who’s involved: Big money rides the move, while retail either gets stopped out or trapped on the wrong side.
- Clues:
- Clear break of structure (BOS) in the direction of the new trend.
- Pullbacks into supply/demand zones before continuation.
- Strong momentum candles showing imbalance in favor of the dominant side.
- Psychology: Retail traders who got tricked in the manipulation now feel forced to chase. They enter too late, right before the next pullback.
Bullish vs Bearish Phases
- Bullish sequence: Accumulation → manipulation to the downside → distribution upward.
- Bearish sequence: Accumulation → manipulation to the upside → distribution downward.
The cycle is the same. The direction changes.
Why These Phases Matter
- They explain why ranges, sweeps, and trends happen.
- They give you a map: instead of reacting blindly, you can ask yourself, “Which phase am I in right now?”
- They tie everything together:
- Accumulation builds liquidity.
- Manipulation grabs it.
- Distribution rides the real trend.
Practical takeaway: Don’t just mark support and resistance, ask which phase you’re in.
Trading against the phase is like running uphill. Trading with it is like letting gravity do the work.
6. Common Mistakes When Reading Market Structure
Even after learning highs, lows, BOS, CHOCH, supply/demand, and liquidity, many traders still fail because they fall into the same traps. Let’s break down the biggest mistakes:
Forcing a Trend Where There Is None
New traders hate ranges. They want action, so they draw trendlines on sideways chop and convince themselves they’re in an uptrend or downtrend.
The truth: most of the market’s time is spent in accumulation/ranging phases. If you can’t sit on your hands and wait, you’ll donate money to the market.
Ignoring the Higher Timeframe
A 5-minute chart may look bullish, but zoom out to the 4H or daily and you might be trading against a massive bearish trend.
The truth: structure is fractal. Always use top-down analysis: start from the higher timeframe, then refine your entries on the lower timeframe.
Mislabeling BOS and CHOCH
Many traders confuse a normal pullback with a break of structure. They sell every dip in an uptrend or buy every rally in a downtrend.
The truth: a BOS confirms trend continuation, while a CHOCH is just an early warning. One candle poking below a Higher Low is not a confirmed reversal it might just be liquidity hunting.
Treating Supply/Demand Zones Like Magic Boxes
Some traders draw every single small candle as a zone until the chart looks like Tetris.
The truth: not every candle matters. The best zones are clear impulses, clean imbalances, and obvious liquidity grabs. Quality over quantity.
Forgetting the Role of Liquidity
Retail traders often think price “respects levels” because of technicals. In reality, price often targets liquidity first before moving in its real direction.
The truth: stop-losses, stop orders, and limits fuel price moves. If you ignore liquidity, you’ll always wonder “why did price fake me out?”
Overcomplicating Structure
Some traders add so many rules, indicators, and “secret models” that they lose sight of the basics.
The truth: Structure is simple: higher highs/lows = uptrend, lower highs/lows = downtrend, equal highs/lows = range. Master the basics first, then layer in complexity.
Practical takeaway: The market punishes impatience and overcomplication. If you can avoid these mistakes, you’ll already be ahead of 90% of traders who blow up accounts by misreading structure.
7. Conclusion: Market Structure Is the Foundation
If you’ve made it this far, you already understand more than most retail traders. You now know that:
- Price is not random — it moves in sequences of highs and lows.
- Trends (HH/HL or LH/LL) and ranges (equal highs/lows) are the market’s DNA.
- Supply and demand zones are footprints of institutional orders.
- Liquidity pools and imbalances act like magnets, driving price to key areas.
- Phases of the market (Accumulation → Manipulation → Distribution) explain why these cycles repeat over and over.
But here’s the brutal truth: knowing structure alone won’t make you profitable.
Market structure is the framework, the skeleton. To trade successfully, you’ll need flesh on those bones: precise entries, risk management, and complete strategies.
That’s why in the coming lessons, we’ll go deeper:
- Indicators 104: Tools, Not Magic: how to use them correctly, without relying on them blindly.
- Strategy Building 105: combining psychology, risk management, market structure, and indicators into a complete, testable plan.
Don’t rush to “find a strategy.” First, master the language of the market. Once you can read structure with clarity, every tool and every strategy will make more sense and you’ll stop being the trader who gets trapped, and start being the trader who understands why.